


A Class A motorhome can feel surprisingly manageable once it is rolling down a wide interstate.
The difficult moments often arrive much more slowly.
A narrow campground entrance. A fuel island with concrete posts on both sides. A right turn between trees. A crowded parking lot. The final few feet while backing into a site.
From the driver's seat, the front of the coach may be easy to judge. The rear of the vehicle can be thirty feet or more behind you, with a tall body, a rear section extending behind the axle, and very little direct sightline to anything close to the bumper.
Add a small car behind the motorhome and the visual picture changes again.
This is why rear cameras have become such a useful feature on Class A motorhomes. Many newer models already include a factory rear camera, and some also offer left- and right-side camera views.
That leads to a more useful question than simply asking whether a Class A needs a backup camera:
Does the camera system already on your motorhome show the areas you actually need to see?
For one owner, the factory rear camera may be enough. Another driver may regularly tow a car, maneuver through tight campgrounds, or have limited visibility around both rear corners. In that case, additional rear or side views can make the camera system more useful.
The goal is to identify the missing view first, then choose the simplest setup that fills that gap.
Quick Navigation
- Quick Answer
- Check the Factory System First
- Why Rear Visibility Matters
- Why One Rear Camera May Be Limited
- Tail Swing and Side-Rear Views
- What Three Cameras Add
- Multi-View Options for Class A RVs
- Why Class A Owners Tow Cars
- Three Common Towing Methods
- Flat-Towing Backing Restriction
- Camera Views With a Toad
- Portable Second-Camera Option
- Should You Upgrade?
- Camera & Towing Checklist
- Frequently Asked Questions
Towing reminder: Camera views do not change the operating limits of a tow bar, tow dolly, trailer, motorhome chassis, hitch, or towed vehicle. Standard flat-tow systems commonly prohibit backing while connected. Follow the instructions for the exact motorhome, hitch, tow equipment, supplemental braking system, and towed vehicle before towing or maneuvering.
Quick Answer: Does a Class A Motorhome Need a Backup Camera?
A rear camera is highly useful on a Class A because the driver has limited direct visibility immediately behind such a large vehicle.
Many modern Class A motorhomes already include one from the factory.
The next question is whether that factory system provides enough coverage for the way you travel.
| Your Current Setup | What to Consider |
|---|---|
| Good factory rear camera + useful left/right cameras | Use and evaluate the existing system before buying additional equipment |
| Good rear camera but no useful side views | Consider whether left/right side context would help with turns and campground maneuvering |
| Rear camera view is narrow or poorly positioned | Identify which rear area is missing before choosing another camera |
| Factory system works but you tow a car | Consider whether the tow connection, toad, or another selected rear area needs a supplemental view |
| No usable rear camera | An aftermarket rear or multi-camera setup becomes more relevant |
| Flat-towed vehicle behind the coach | Use cameras for visual context while continuing to follow flat-tow operating restrictions |
More cameras are useful only when each one answers a real visibility problem.
A practical Class A setup may consist of a single good rear view, a rear-plus-side system, or an existing factory system supplemented by one portable camera.
Start With the Factory Camera System
Before installing anything, sit in the driver's seat and understand what the motorhome already has.
Camera packages vary by manufacturer, model year, floorplan and option package.
Some recent Class A motorhomes include a rear camera as standard equipment while offering side-view cameras as an option. Other coaches may already have rear, left and right views integrated into the dash display.
Check the Exact Coach, Not the Model Name Alone
Verify:
- model year
- floorplan
- factory option package
- rear camera presence
- left-side camera presence
- right-side camera presence
- turn-signal camera activation
- display size
- single, split or multi-view capability
If you are buying a used Class A, also check whether the camera system is still original.
A previous owner may have replaced the monitor, changed the camera position or added aftermarket equipment.
Test the System in the Situations That Matter
A camera that looks fine while the RV is parked on a dealer lot may feel very different during an actual campground maneuver.
Test:
- the area immediately behind the coach
- the farther rear area
- both rear corners
- side views during slow turns where available
- night or low-light image quality
- the display while wearing your normal driving glasses or sunglasses
Use the existing system long enough to identify a real limitation before deciding what to add.
What to remember: “Class A motorhome” does not describe one universal camera package. Verify the exact factory equipment before planning an aftermarket upgrade.
Why Rear Visibility Matters More on a Class A
A Class A motorhome places the driver far ahead of the rear bumper.
Large mirrors help enormously with side awareness, but they cannot create a direct line of sight through the entire coach.
The Rear of the Coach Is Far Away
The farther the driver's seat is from the back of the RV, the harder it becomes to judge close rear objects through normal direct observation.
At a campsite, that may include:
- a utility pedestal
- a picnic table
- a tree
- a short post
- another vehicle
- camping gear
- the back edge of the parking pad
A rear camera can keep a selected area behind the coach visible while the motorhome moves slowly.

The Body Is Tall
The height of a Class A creates another visibility challenge.
A driver looking through mirrors may see a large vehicle behind the RV while missing something much closer to the bumper and lower to the ground.
The actual view depends on camera height, angle, lens and installation.
The Rear Axle May Be Well Ahead of the Rear Bumper
Depending on the chassis, wheelbase and coach design, a meaningful section of the motorhome may extend behind the rear axle.
That matters when turning because the rear body follows a different path from the front of the coach.
This is one reason campground turns and fuel stops deserve as much attention as backing itself.
Why One Rear Camera May Still Leave Important Areas Hard to See
A rear camera usually does its strongest work directly behind the coach.
That leaves several other viewing questions.
| Area | Why It May Still Be Difficult to See |
|---|---|
| Main rear area | A centered rear camera generally covers this area most directly |
| Left rear corner | An object close beside the coach may sit outside the main rear-camera frame |
| Right rear corner | The passenger-side rear area can be difficult to judge from the driver's position |
| Very close rear area | A camera aimed farther behind the RV may provide less detail immediately below or near the rear body |
| Tow connection | A view optimized for farther rear traffic may not be ideal for the hitch or tow-bar area |
| Towed vehicle | A close rear view may show the connection clearly while providing less context around the full toad |
This does not mean a single rear camera is inadequate for every Class A.
It means camera placement involves a tradeoff.
A lens aimed downward provides different information from one aimed farther toward the road.
A wide rear view provides different information from dedicated left- and right-side cameras.
The right number of cameras depends on which of those views matters to your driving and towing setup.
Tail Swing Makes Side-Rear Awareness Important
A large motorhome does not rotate around its front bumper.
During a turn, the body behind the rear axle can move toward the opposite side of the turn.
This movement is commonly discussed as rear overhang or tail swing.
Think About a Right Turn
As the front of the motorhome turns to the right, the rear body behind the axle can move toward objects on the left side.
Depending on the coach geometry, that can matter around:
- fuel pumps
- bollards
- parked vehicles
- campground posts
- trees
- gate structures
- tight parking-lot entrances
The opposite pattern can occur during a left turn.
A Rear Camera and Side Camera Answer Different Questions
A centered rear view tells you what is happening behind the coach.
A side camera can add a selected view alongside the vehicle or near a rear corner.
Mirrors remain an essential part of the process.
The additional camera view gives the driver another reference while planning and completing a slow maneuver.
It does not provide complete coverage of every surrounding area.
What to remember: Class A visibility is about more than the space directly behind the bumper. Rear overhang and side-rear movement make the left and right sides worth evaluating too.
What a Three-Camera RV System Adds
A three-camera layout typically assigns one camera to the rear and one to each side.
The value comes from giving each camera a specific job.
Main Rear Camera
The rear camera can provide visual context for:
- backing
- campsite positioning
- the area behind the motorhome
- a toad or trailer where the installation supports that view
Left-Side Camera
A left-side view can supplement the mirror during:
- campground turns
- selected lane-change situations
- fuel-station approaches
- slow maneuvers near the driver-side rear area
Right-Side Camera
A passenger-side view can be especially useful because that side is farther from the driver.
It may add context for:
- right-side campground boundaries
- slow turns
- selected lane-change situations
- objects near the passenger-side rear quarter
Three cameras do not create a guaranteed 360-degree view or eliminate blind spots.
They provide three selected perspectives that can be used with mirrors, direct sight, walk-arounds and a spotter where appropriate.
Multi-View Camera Options for a Larger Class A
For a Class A owner who has identified missing rear and side views, a multi-camera system can consolidate several perspectives on one display.
CampSync D1: Two Rear Perspectives Plus Both Sides
The CampSync D1 uses three physical cameras and four lenses.
The layout consists of:
- one dual-lens rear camera
- one left-side camera
- one right-side camera
The dual-lens rear camera can provide two different rear perspectives while the side cameras add selected left- and right-side views.
For a long Class A, that arrangement can be useful when the driver wants both:
- a closer rear reference
- a farther rear reference
- left-side context
- right-side context
The exact usefulness depends on mounting position, coach geometry and how the cameras are aimed.

WF4: Rear + Left + Right
The WF4 multi-camera setup uses:
- one rear camera
- one left-side camera
- one right-side camera
Its 7.2-inch monitor supports single, dual and triple viewing modes.
This gives the driver a straightforward rear-plus-two-sides arrangement when one main rear perspective is enough.
Wireless Still Requires Power
With these RV systems, “wireless” refers to transmission of the video signal.
The cameras and display still require their supported electrical connections.
Installation on a long Class A should also account for coach length, mounting position, electrical access and expected wireless transmission conditions.
Do not assume that every camera position on every long motorhome will produce identical signal performance.
Why Class A Owners Often Tow a Smaller Vehicle
The same features that make a Class A comfortable at a campground can make it inconvenient for short local trips.
Once the motorhome is parked, the owner may have:
- leveled the coach
- extended slide-outs
- connected shore power
- connected water
- set up outdoor equipment
Breaking down the campsite for a grocery run can become a surprisingly large task.
A smaller vehicle solves that problem.
It can handle:
- grocery trips
- restaurant visits
- trailhead parking
- city driving
- attraction parking lots
- day trips away from the campground
For many travelers, the Class A handles the long-distance journey while the smaller vehicle handles local transportation after arrival.
That smaller vehicle is often called a toad or dinghy vehicle.
Three Common Ways to Bring a Car Behind a Motorhome
The camera needs can change depending on how the vehicle is transported.
1. Flat Towing / Four-Down / Dinghy Towing
With flat towing, all four wheels of the towed vehicle remain on the road.
A typical setup can involve equipment such as:
- a compatible motorhome receiver
- a tow bar with an appropriate rating
- a vehicle-specific baseplate
- safety cables
- lighting or wiring equipment
- a supplemental braking system as required by the applicable setup and rules
The towed vehicle itself must be approved for the intended flat-towing procedure.
Check its owner's manual and manufacturer guidance before choosing this method.
2. Tow Dolly
A tow dolly typically supports one end of the car while another pair of wheels remains on the road.
This creates its own questions involving:
- vehicle compatibility
- dolly capacity
- loading procedure
- tie-down procedure
- braking and lighting
- campground storage
Follow the dolly, motorhome and vehicle manufacturers' instructions for the specific combination.
3. Car Trailer
A full car trailer carries the complete vehicle off the road surface.
This adds another large piece of equipment behind the Class A.
Planning needs to include:
- trailer weight
- vehicle weight
- motorhome towing rating
- receiver and hitch ratings
- trailer brakes and lighting
- overall combination length
- parking and campground storage
Whichever towing method you choose, use the ratings and procedures for the actual motorhome, chassis, hitch, towing equipment and vehicle.

Important: A Camera Does Not Change Flat-Towing Backing Restrictions
This distinction matters because adding a clearer rear camera can create more confidence in the view behind the coach.
The tow equipment still has the same mechanical limits.
For example, Blue Ox instructs users not to back up with its tow bar connected to the towed vehicle.
Reverse movement can cause the towed vehicle to track incorrectly, bind or jackknife and can place loads on the tow bar, baseplate and vehicle structure that the system was not designed to handle.
A clearer image of the toad does not make that maneuver acceptable.
Plan the Exit Before Entering a Tight Area
When flat towing, think ahead at:
- fuel stations
- restaurants
- parking lots
- campground registration areas
- dead-end roads
- tight campsite loops
Look for a route that allows the motorhome and toad to continue forward.
If backing becomes necessary, follow the tow-bar, motorhome and towed-vehicle instructions for disconnecting and repositioning the equipment.
Flat-tow rule: Never use a camera view as justification for reversing a connected flat-tow setup when the equipment manufacturer prohibits it. The towing system's operating instructions control the maneuver.
Towing a Car Changes the Visual Picture Behind the RV
Without a toad, the rear camera can focus entirely on the area behind the motorhome.
With a toad attached, several reference areas may become important at the same time.
The Connection Area
You may want visual context around the area immediately behind the motorhome where towing equipment is located.
A camera can help you see the general relationship of the equipment from the driver's position.
The physical pre-trip inspection still needs to verify items such as:
- tow-bar attachment
- pins and retaining devices
- safety cables
- electrical connection
- supplemental braking equipment
- lighting
A camera image cannot confirm that those components are installed, rated or secured correctly.
The Towed Vehicle
A farther rear perspective can help keep the toad within the driver's visual context while traveling.
The useful field of view depends on camera height, angle and the distance between the motorhome and towed vehicle.
Both Sides of the Coach
The addition of a towed vehicle increases the overall combination length.
Left- and right-side views can add context when the driver is:
- approaching a campground turn
- moving through a fuel station
- evaluating selected lane-change situations
- passing roadside objects at low speed
The cameras supplement the mirrors and normal driving observations.
What to remember: Towing can create three different viewing needs: the connection area, the towed vehicle farther behind, and the left/right sides of the motorhome.
When a Portable Second Camera Can Be Useful
A complete multi-camera replacement is not always necessary.
Some Class A owners already have a factory rear camera that works well.
The missing view may be one temporary or highly specific area.
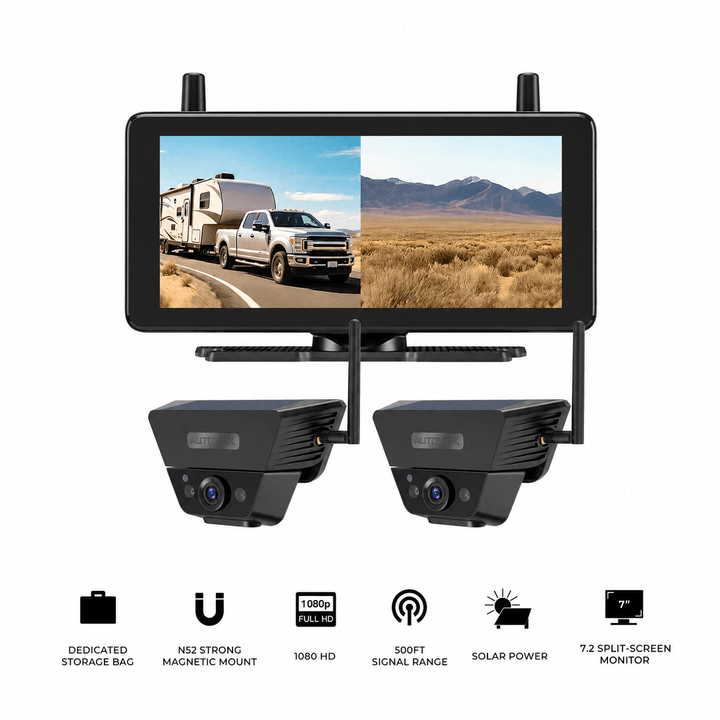
The Solar5B Dual-Camera Kit provides a dedicated monitor with two portable magnetic cameras.
Depending on suitable mounting surfaces and the vehicle layout, one camera can provide the main selected view while the second can be moved toward another area such as:
- a rear corner
- a hitch or tow connection area
- a selected side-rear area
- a temporary campsite positioning reference
A standard Solar5B offers the simpler one-camera version for owners who need only one portable rear perspective.
Portable and Fixed Systems Solve Different Problems
A fixed rear-plus-side system makes sense when the same views are useful on most travel days.
A portable camera can make more sense when the missing view changes with the task.
For example, an owner may use the factory rear camera for normal driving and place a portable camera near another suitable area during a campsite maneuver.
The camera remains a visual reference.
It does not verify towing-system installation, exact clearances or safe load limits.
Should You Upgrade the Factory Camera System?
The decision becomes much easier once you evaluate the existing system in real driving and parking situations.
Keep the Factory System When It Already Does the Job
An upgrade may add little value if you already have:
- a clear rear view
- useful left/right side views
- a display you can read comfortably
- camera positions that work with your towing setup
Use those features first.
Consider More Side Context When Rear Coverage Is Already Good
If the rear view is useful but the motorhome has no side-camera views, evaluate whether the difficult areas occur during:
- turns
- campground roads
- fuel-stop maneuvering
- selected lane-change situations
A rear-plus-left-plus-right system may address that pattern more directly than adding another rear-only camera.
Consider a Supplemental Camera When the Missing View Is Specific
If the factory system works most of the time and towing introduces one additional viewing need, a portable second camera may be enough.
Review Installation Limits Before Buying
Check:
- camera mounting locations
- available power
- existing side-marker configuration
- monitor location
- coach length
- wireless transmission path
- weather exposure
- compatibility with existing equipment
Also decide whether you prefer:
- one permanent multi-view monitor
- the existing factory display plus a supplemental display
- a portable system used only when needed
Class A Camera and Towing Checklist
| Check | What to Confirm |
|---|---|
| Motorhome | Exact year, manufacturer, model, floorplan, length and applicable chassis information |
| Factory rear camera | Whether it is installed, functional and positioned usefully |
| Factory side cameras | Whether left/right cameras are installed and how they activate |
| Display | Screen size and single, split or multi-view capability |
| Close rear view | Whether the area immediately behind the coach is visible enough for your needs |
| Farther rear view | Whether the system provides useful context farther behind the motorhome |
| Side areas | Which left/right areas remain difficult to observe |
| Towing method | No toad, flat tow, tow dolly or full trailer |
| Motorhome towing limits | Chassis, receiver and manufacturer ratings |
| Towed vehicle | Approved towing procedure from its manufacturer |
| Tow equipment | Correct ratings, setup and operating procedures |
| Camera location | Which physical area each camera is intended to show |
| Power | Compatible and properly installed electrical supply |
| Physical inspection | Hitch, tow equipment, safety devices and surroundings checked directly |
| Manuals | Motorhome, chassis, hitch, tow equipment and towed-vehicle instructions available |
AUTO-VOX Camera Options for Class A Motorhomes
| Product | Camera Layout | Best Fit in This Article |
|---|---|---|
| CampSync D1 | 3 cameras / 4 lenses | Closer/farther rear context plus selected left and right views |
| WF4 | 1 rear + 2 side cameras | Straightforward rear, left and right multi-view setup |
| Solar5B Dual-Camera Kit | 2 movable cameras | Flexible main view plus a selected supplemental angle |
| Solar5B | 1 portable camera | Simple portable rear-view option |
Camera Options for Class A Rear and Side Visibility



Prices, configurations and availability may change. Confirm the current product page, selected configuration, motorhome compatibility, camera mounting locations, electrical requirements and expected transmission conditions before purchase.
Common Class A Camera and Towing Mistakes
Assuming Every Class A Has the Same Factory Camera Package
Rear and side-camera equipment can vary by manufacturer, model year, floorplan and option package. Check the exact coach.
Looking Only Directly Behind the Motorhome
Evaluate the rear corners and side-rear areas too, especially when the coach has significant body length behind the rear axle.
Assuming Three Cameras Create Complete Surround Coverage
A three-camera system provides selected rear, left and right perspectives. Areas outside those fields of view still require mirrors, direct checks and normal observation.
Forgetting That a Toad Changes the Combination Length
The motorhome may feel familiar by itself, while the connected toad adds another vehicle and towing system behind it.
Using the Camera Instead of Inspecting the Tow Equipment
Physically verify the tow bar or trailer connection, pins, safety equipment, lighting and supplemental braking components according to their instructions.
Assuming Better Rear Visibility Makes Flat-Tow Backing Acceptable
Camera visibility does not change a tow-bar manufacturer's prohibition on reversing while connected.
Buying an Aftermarket System Before Testing the Factory Cameras
Identify the actual missing view first. The existing rear and side cameras may already cover the areas you need.
Frequently Asked Questions
Do Class A motorhomes come with backup cameras?
Many newer Class A motorhomes include a factory rear camera, and some also include or offer side-view cameras. Equipment varies by manufacturer, model year, floorplan and option package, so check the specification sheet and actual coach before assuming a particular camera configuration.
Is one rear camera enough for a Class A RV?
It can be enough when the rear view is clear and the mirrors provide adequate side context for the driver's normal use. Additional left and right cameras may be useful on larger coaches, in tight campground maneuvering, or when important side-rear areas remain difficult to observe.
What is the advantage of a three-camera RV system?
A typical three-camera system provides a main rear view plus selected left- and right-side views. CampSync D1 uses three physical cameras and four lenses because its rear camera contains two lenses, adding two different rear perspectives alongside the two side-camera views.
Can I back up a Class A while flat towing a car?
Standard tow-bar flat-towing setups commonly prohibit backing while the towed vehicle remains connected. Blue Ox, for example, specifically instructs users not to back up with its tow bar connected. Follow the instructions for your exact tow bar, motorhome and towed vehicle and disconnect according to those procedures when backing is required.
What is the difference between flat towing, a tow dolly, and a car trailer?
Flat towing keeps all four wheels of the towed vehicle on the road. A tow dolly supports one end of the vehicle while another pair of wheels remains on the road. A full car trailer carries the complete vehicle. Each method has its own compatibility, weight, braking, connection and operating requirements.
Can an aftermarket RV camera replace a spotter or towing inspection?
No. Cameras add selected visual information. Continue using mirrors, direct observation, walk-arounds and a spotter where appropriate. Tow-bar connections, hitch components, safety cables, lighting, supplemental braking equipment and other towing hardware still require direct inspection according to their manuals.
Final Thoughts: Start With the Views You Already Have
A Class A motorhome benefits greatly from rear visibility, but the upgrade decision should begin with the equipment already installed.
Start with four questions:
- What rear and side cameras does this exact motorhome already have?
- Which area is still difficult to see during actual travel or campsite maneuvering?
- Will the motorhome travel by itself, flat tow a car, use a tow dolly, or pull a trailer?
- Does the missing view justify a portable supplemental camera or a fixed rear-plus-side system?
If the factory rear and side cameras already give you the views you need, there may be little reason to replace them.
If the main rear view is useful but one towing or campsite angle remains difficult to see, a portable dual-camera setup can fill a specific gap.
If the coach regularly needs rear, left and right context, a multi-camera system such as CampSync D1 or WF4 may better match the way the Class A is driven.
Towing adds another layer to every decision. Camera placement should account for the motorhome, towing connection and towed vehicle, while the physical towing setup continues to follow the ratings and procedures in the relevant manuals.
Most importantly, a better camera image does not change what the tow equipment can safely do.
Before upgrading a Class A motorhome camera system, verify the factory rear and side-camera configuration and confirm how the motorhome will tow and park. Then decide whether a flexible dual-camera setup or a rear-plus-side multi-camera system fills the actual view that is missing.


