


A bad RV trip usually starts with something small.
A route looks fine on the map. A fuel stop seems easy enough. The campground appears close enough to reach before dark.
Then one delay leads to another.
The road turns out to be narrower than expected. The fuel station has barely enough room for a motorhome to swing through. Arrival slips later into the afternoon. Everyone is tired by the time the RV reaches the campsite, and backing into the site suddenly demands much more attention than anyone expected.
Setup starts with the same rushed energy. Water needs to be connected. Power needs to be checked. Leveling still needs to happen. Gear has to come out. Dinner is already late.
That combination is where small oversights begin stacking up.
A frustrating trip can still teach you a lot. Every awkward moment points to something worth turning into a better routine for the next trip.
These seven lessons focus on the moments that tend to create the most stress in an RV, motorhome or camper—and the small habits that make the next trip easier.
Quick Navigation
Important: RV procedures vary by vehicle, campground, electrical system, plumbing system and installed equipment. Follow the RV manufacturer's instructions and campground guidance. Camera systems provide additional visibility alongside mirrors, direct observation, walk-arounds, spotters and driver judgment.
Lesson 1: A Normal Navigation Route Is Not Automatically an RV Route
One of the easiest RV mistakes happens before the vehicle leaves the driveway.
A destination goes into a navigation app. The estimated arrival time looks reasonable. The suggested route seems straightforward.
An RV adds a few more questions.
- Is there a low bridge or tunnel?
- Does the road have a weight restriction?
- Are the lanes unusually narrow?
- Can a long motorhome handle the turns comfortably?
- Does the route include a steep climb or descent?
- Can the planned fuel station handle the full vehicle length?
- Is there somewhere to turn around if the road becomes unsuitable?
One awkward route choice can reshape the entire driving day.
A twenty-minute delay pushes the fuel stop later. Lunch moves back. Campground arrival slips closer to sunset. The driver reaches the most technical part of the day with fewer daylight hours and less energy.
Build the Route Around the RV
| Route Factor | What to Check |
|---|---|
| Height | Bridges, tunnels, parking structures, branches and campground entrances |
| Weight | Bridge and road restrictions |
| Width | Narrow roads, construction zones and shoulder clearance |
| Length | Tight turns, campsite limits, fuel stations and turnaround space |
| Grade | Long climbs, descents and mountain roads |
| Fuel | Stations with enough entrance, pump and exit room |
| Arrival | Whether the final approach is easier before dark |
An alternate route is worth saving too. Route decisions feel much easier before departure than they do with a large RV already committed to an awkward road.
What to remember: Check the route against the RV's real height, weight, width and length before the driving day begins.
Lesson 2: Walk the Campsite Before You Back Into It
Campground arrival is one of those moments when two extra minutes can make the rest of setup feel much easier.
After hours on the road, everyone wants to park, stretch their legs and start dinner. The campsite may look wide enough from the entrance.
Walking it first usually reveals more.
A low stump may sit near the passenger-side rear corner. The utility pedestal may be closer to the backing line than expected. A branch can extend over the site. One side of the pad may slope away more sharply than it appears from the driver's seat.
Those details are much easier to deal with before the RV starts moving.

Take a Quick Site Walk
Look for:
- the final rear-bumper position
- both rear corners
- utility pedestals
- water and sewer connections
- fire rings
- picnic tables
- rocks and stumps
- branches and overhead clearance
- soft or sloped ground
- neighboring RVs and slide-outs
- a safe position for the spotter
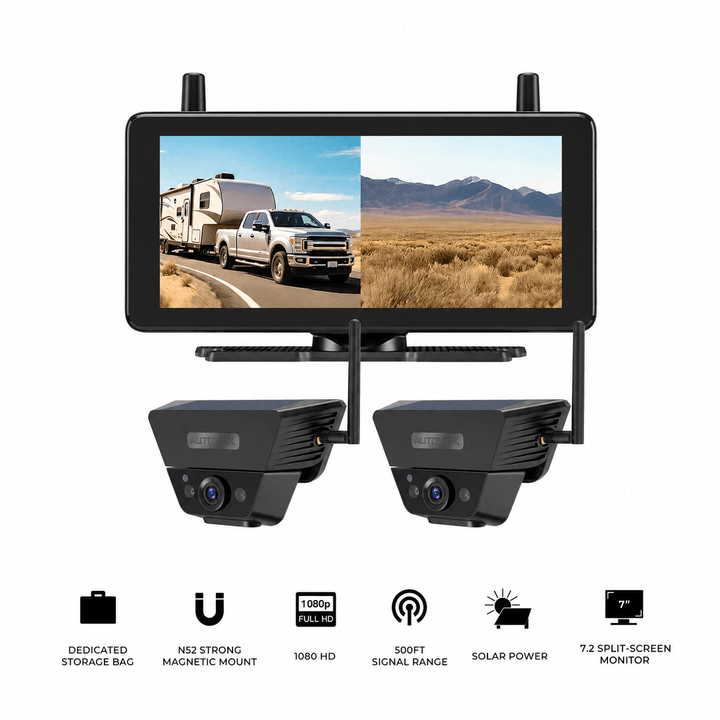
For a setup that needs one main rear view plus a flexible second angle, the Solar5B Dual-Camera Kit can provide two selected perspectives.
One camera can cover the normal rear approach. The second magnetic camera can be positioned, where the vehicle and mounting surface allow, toward an area that is harder to judge from the driver's seat, such as the passenger-side rear corner, hitch or campsite boundary.
The most useful setup gives each camera a separate job. Two nearly identical views add little extra information.
The site walk also covers information outside the camera frame, including overhead branches, soft ground and low obstacles near the edge of the campsite.
Before moving, take a moment to confirm what the mirrors and each camera view actually show. That simple check makes communication with a spotter much easier once the backing maneuver begins.
What to remember: Walk the campsite first, identify the difficult areas and assign each camera view a clear purpose.
Lesson 3: One Rear Camera May Miss the Area You Need Most
“Seeing behind the RV” sounds like a single visibility need.
In practice, several different areas matter.
Traffic farther behind the vehicle is one view. The bumper and hitch are another. A bike rack changes the closest rear edge again. The passenger-side rear corner becomes important during an angled backing maneuver.
Each angle serves a different purpose.
| View | What It Helps You Understand |
|---|---|
| Farther rear | Traffic and the road behind the RV |
| Close rear | Bumper, hitch, bike rack or final stopping area |
| Left side | Driver-side rear area during turns or maneuvers |
| Right side | Passenger-side rear area and nearby obstacles |
For a larger motorhome, fifth wheel or longer camper that regularly needs several rear and side perspectives, the CampSync D1 multi-camera RV system uses 3 cameras and 4 lenses: one dual-lens rear camera and two side cameras.
The different views can take on different jobs:
- A farther rear perspective can show traffic behind the RV.
- A closer rear perspective can show the bumper, hitch or rear-mounted gear.
- The left and right cameras can provide additional side context.
The driver can choose the views that match the current situation.
Normal highway driving may call for a simpler screen layout. A campground turn or angled backing approach may make another combination more useful.
Mirrors, direct observation and a spotter remain part of the visibility routine, especially around overhead hazards, uneven ground and tight campsite boundaries.
What to remember: Give each camera a clear job and use the views that match the current maneuver.
Lesson 4: Check Campground Water Pressure Before Settling In
Water hookup feels simple after a long drive: connect the hose, turn the spigot and move on to the next job.
The hose fits. The spigot looks normal. Several nearby RVs are already connected.
Pressure is the part that deserves a quick check before moving on.
Campground water pressure can vary, while the plumbing inside an RV has its own operating limits. The right pressure depends on the vehicle and its plumbing components.
Use a Repeatable Water-Hookup Routine
- Check the campground spigot and RV inlet.
- Use an RV potable-water hose.
- Install a suitable pressure regulator.
- Use a pressure gauge when appropriate for the setup.
- Turn the water on gradually.
- Check the regulator, filter, hose and fittings.
- Look inside the RV for drips before walking away.
The RV manufacturer's pressure guidance provides the right reference for that vehicle.
A second check a few minutes after connecting can also catch slow leaks around a fitting or filter housing.
What to remember: Verify campground water pressure each time you connect and give the fittings another look after the system has been pressurized.
Lesson 5: Electrical Protection Matters on Clear Days Too
Electrical protection often gets associated with thunderstorms and lightning.
Campground power can present other problems as well.
Depending on the pedestal and electrical system, an RV may encounter low voltage, high voltage, reverse polarity, an open neutral or another wiring condition.

Know What the Protection Device Actually Monitors
A basic surge protector primarily addresses voltage spikes.
An electrical management system, depending on the model, may also monitor conditions such as:
- high voltage
- low voltage
- reverse polarity
- open neutral
- open ground
- frequency problems
- other wiring faults
The specifications tell you exactly what a particular device monitors.
A Better Electrical-Hookup Sequence
- Look at the pedestal before plugging in.
- Check for cracks, looseness, discoloration or obvious heat damage.
- Use electrical protection appropriate for the RV service.
- Check the device status before fully energizing the RV.
- Take fault warnings seriously.
- Ask campground staff to inspect an abnormal pedestal.
Changing pedestals or waiting for an electrical check may interrupt setup for a few minutes. It can also prevent a much longer troubleshooting session inside the RV.
What to remember: Make the pedestal inspection and electrical protection part of every campground hookup routine.
Lesson 6: Test the Camera Before the Difficult Maneuver Begins
A camera setup can change between trips.
A magnetic camera may shift slightly. Dust can cover the lens. A battery may sit lower after storage. A bike rack can block part of the image. The monitor may open on a different channel from the one the driver expects.
All of these are easy problems to fix while the RV is parked in an open space.
They become far more inconvenient once the vehicle is halfway into a tight campsite.
Check the View Before Leaving
- clean the lens
- check the mount
- confirm battery or electrical power
- turn on the monitor
- make sure the image is live
- check every camera channel
- verify the viewing angle
- look for bicycles or cargo blocking the view
- recheck the mount after rough roads
Smart Reversing Assist Adds Another Cue
During campsite backing, driveway reversing and similar low-speed situations, Solar5B AI with Smart Reversing Assist can highlight people and vehicles detected within the parking guideline area.
Display-mode note: In single-screen mode, Smart Reversing Assist provides visual detection boxes and audible alerts when a person or vehicle is detected within the parking guideline area. In dual split-screen mode, visual highlighting remains available while the audible alert is unavailable.
Smart Reversing Assist provides an additional reversing cue. Steering, braking and parking remain fully under driver control.
The system is designed to identify people and vehicles within the parking guideline area. Curbs, branches, rocks, animals and other objects still require normal visual checks.
Wireless refers to video-signal transmission. The camera and display require their supported electrical power or charged battery.
Solar charging provides supplemental charging. Battery level still deserves a check before departure, especially after storage, shade or extended use.
Camera Options for RV Reversing and Visibility


Prices and configurations may change. Confirm the current product page, vehicle compatibility, mounting method and power requirements before purchase.
Once the equipment is working as expected, practice switching between the relevant views while the RV is stationary. That makes the display much easier to use when attention is divided between mirrors, a spotter and the surrounding campsite.
What to remember: Check the camera while there is still plenty of room and time to correct the setup.
Lesson 7: The Final Walk-Around Is the Last Chance to Catch a Small Mistake
Departure morning can feel deceptively easy once everything inside is packed.
Navigation is running. Coffee is in the cup holder. Everyone is seated. The interior looks secure.
The outside of the RV still deserves one final loop.

Use the Same Exterior Order Every Time
- exterior storage doors closed and latched
- entry step retracted where required
- awning fully retracted
- slide-outs fully retracted
- shore-power cable disconnected and stored
- freshwater hose disconnected and stored
- sewer hose disconnected, capped and stored
- leveling blocks collected
- wheel chocks accounted for
- jacks and stabilizers retracted
- bike rack, spare tire and rear-mounted gear secure
- camera mounts secure
- lights and license plate unobstructed
- tires visually checked
- nothing left under or behind the RV
Look Back at the Campsite Too
A quick scan can catch the items that easily get left behind:
- chairs
- tools
- water fittings
- electrical adapters
- leveling blocks
- pet equipment
- trash
- personal items
Consistency makes this routine easier to remember.
Start in the same place. Walk in the same direction. Check the same areas in the same order.
If someone interrupts the process, returning to the last completed point is much easier.
What to remember: Finish every departure with one complete exterior loop around the RV.
Turn the Seven Lessons Into One Fixed Checklist
| Lesson | Fixed Action for the Next Trip |
|---|---|
| 1. Route | Verify height, weight, width, length, restrictions, fuel access and turnaround space |
| 2. Campsite | Walk the site and identify rear, side, overhead and ground hazards before backing |
| 3. Visibility | Know what each mirror and camera view shows and where uncertainty remains |
| 4. Water | Use the correct regulator and inspect the complete hookup for leaks |
| 5. Electricity | Inspect the pedestal and use electrical protection suited to the RV |
| 6. Cameras | Check the lens, mount, power, live image, angle and selected channels before departure |
| 7. Walk-around | Complete the same final exterior loop before the RV moves |
60-Second Final Departure Scan
- Route suitable for the RV
- Mirrors correctly adjusted
- Camera image live
- Exterior compartments latched
- Slides and awning retracted
- Utilities disconnected
- Jacks and stabilizers retracted
- Wheel chocks accounted for
- Rear-mounted gear secure
- Tires visually checked
- Nothing left under or behind the RV
Frequently Asked Questions
Why should I use RV-aware routing instead of normal navigation alone?
RV travel adds height, weight, width, length, grade and turnaround considerations that may have little effect on passenger cars. Check the route against the actual vehicle before departure.
Should I walk a campsite before backing?
A site walk is especially useful when the campsite is unfamiliar, narrow, angled, dark or surrounded by trees, posts, hookups and neighboring RVs. It gives the driver a clearer picture of the full space before the vehicle moves.
Is a second backup camera useful on an RV?
A second camera can add useful information when it covers a different area, such as the passenger-side rear corner, hitch, lower rear zone or campsite boundary. The value comes from giving the second view a separate job.
What is the difference between Solar5B Dual-Camera Kit and CampSync D1?
Solar5B Dual-Camera Kit is a portable two-camera setup with a dedicated monitor. CampSync D1 uses one dual-lens rear camera plus two side cameras, giving the system three cameras and four lenses in total. The better fit depends on the size of the RV, installation preference and the areas the driver wants to see.
What does Solar5B AI Smart Reversing Assist do?
It highlights people and vehicles detected within the parking guideline area. Single-screen mode provides visual detection boxes and audible alerts. Dual split-screen mode provides visual highlighting without the audible alert. Steering, braking and parking remain under driver control.
Why use a water-pressure regulator at a campground?
Campground water pressure can differ from the operating limits of an RV plumbing system. A suitable regulator helps control incoming pressure according to the RV manufacturer's requirements.
What should I look for in campground electrical protection?
Start with the protection features your RV setup needs. A basic surge protector primarily addresses voltage spikes, while an electrical management system may also monitor conditions such as high or low voltage and wiring faults. Check the exact specifications of the device before relying on a feature.
Final Thoughts: Turn a Bad Trip Into a Better Routine
The frustrating parts of an RV trip often look obvious afterward.
The route needed another check. The campsite deserved a quick walk. The water and electricity hookups needed a few extra minutes. The cameras needed to be ready earlier. Departure needed one final loop around the vehicle.
Remembering every small task can be difficult after a long driving day.
A fixed routine takes some of that mental load away.
- Verify the route for the actual RV.
- Walk the campsite before backing.
- Match camera views to the areas that are difficult to judge.
- Regulate and inspect the water hookup.
- Check campground power with appropriate protection.
- Test cameras before the difficult maneuver.
- Complete the final walk-around every time.
The visibility setup can then match the size and use of the vehicle.
A shorter camper may need a straightforward rear view. A longer motorhome or larger rig may benefit from a second movable camera or additional rear-and-side perspectives.
Every one of these habits reduces the amount of guesswork that follows the RV onto the road.
Turn these seven lessons into fixed actions before the next trip, then choose an AUTO-VOX visibility setup that fits the length and viewing needs of the RV.


