


An RV renovation can look perfect while the vehicle is parked.
The pillows are arranged, the plants are in place, the new wall treatment looks better in person than it did in the sample, and the slide-out trim finally feels more like something you would choose for a house.
Then travel day arrives.
The plant needs somewhere to go before the first turn. A decorative frame rattles against the wall. A rug folds into a walkway. A new piece of trim sits closer to the slide than expected. The beautiful storage basket becomes another object that has to be moved before the RV can leave.
That is when an RV renovation gets its real test.
A travel-friendly upgrade needs to work in two modes. It should make the RV more comfortable when parked, and it should remain practical when the slides come in, the cabinets are latched and the vehicle starts moving again.
That does not mean your RV has to feel plain or temporary. It means each renovation decision deserves four questions:
How much weight does it add? How will it stay secure? Does it preserve clearance? Can the systems behind it still be inspected and serviced?
The eight upgrades below use those questions to balance style, comfort and actual travel-day use.
Quick Navigation
- The Travel-Day Renovation Test
- 1. Lightweight Soft Furnishings
- 2. Give Décor a Travel Position
- 3. Use Lightweight Wall Art
- 4. Test Peel-and-Stick Materials
- 5. Keep the Headboard Inspectable
- 6. Respect Slide-Out Clearance
- 7. Create No-Decor Zones
- 8. Add Flexible Visibility
- Travel-Day Renovation Checklist
- Common Renovation Mistakes
- Frequently Asked Questions
Before modifying the RV: Preserve access to emergency exits, safety labels, electrical panels, ventilation, plumbing, wiring, slide-out mechanisms and other service points. Follow the RV and component manufacturers' instructions when a renovation affects a structural, electrical, plumbing, gas, mechanical or safety-related area.
Before You Renovate: Use the Travel-Day Test
It is easy to judge an upgrade from a campground photo.
A more useful test imagines the RV ten minutes before departure.
| Test | Question to Ask |
|---|---|
| Weight | How much weight does this add, and where is that weight located? |
| Securement | Will it stay secured during acceleration, braking, turns and normal road vibration? |
| Travel position | If it cannot stay where it is, where does it go before departure? |
| Clearance | Can slides, cabinets, doors, windows and furniture still move normally? |
| Visibility | Does the driver still have a clear view through required windows and mirrors? |
| Emergency access | Can every emergency exit and safety device still be reached immediately? |
| Serviceability | Can wiring, seals, panels, equipment and fasteners still be inspected? |
| Reset time | Can the RV move from camp mode to travel mode without a long packing routine? |
There is one more question for any renovation that adds permanent material:
What does this do to the RV's available cargo capacity?
One small piece of décor is unlikely to transform the weight of a large RV. A complete renovation can.
Flooring, lumber, furniture, countertops, tile, batteries, appliances and storage additions accumulate quickly.
Use the ratings and cargo information for your specific RV, pay attention to axle loading, and use actual scale weights when you need to understand the loaded rig rather than estimating from individual items.
Upgrade 1: Use Lightweight Soft Furnishings for a Big Visual Change
Textiles are one of the easiest ways to make an RV feel intentional without rebuilding anything.
A different rug, a few pillow covers and a throw can change the room more than a complicated wall project.
They also work well in a moving vehicle when you choose them with travel day in mind.
Prioritize Things That Are Easy to Wash and Store
Useful choices include:
- removable pillow covers
- lightweight throws
- washable rugs
- compact bedding
- fabrics that fold into existing cabinets or storage bins
The goal is to add color and texture without creating a second cargo-management system.
Think About the Travel Position Before Buying
If six decorative pillows have to be moved before every drive, decide where they will go.
If a rug needs to be rolled up because it interferes with a slide or moving furniture, make sure the rolled rug has a secure storage location.
When the storage answer is “we'll put it somewhere,” that usually becomes a travel-day annoyance later.
Watch Cumulative Weight
Soft furnishings are generally lighter than furniture or construction materials, which is one reason they are a practical place to begin.
Still, RV renovations tend to happen in layers.
A heavy rug, weighted blanket, additional mattress topper and several storage baskets all become part of the loaded vehicle.
Choose the visual change you want with as little unnecessary weight as practical.
Travel-day test: If the item is loose when the RV moves, it needs a secure travel position before it becomes part of the renovation.
Upgrade 2: Give Plants and Tabletop Décor a Travel-Day Position
Plants can make a compact RV interior feel warmer almost immediately.
Small lamps, bowls, books and decorative objects can do the same.
The parked-RV question is where they look good.
The moving-RV question is where they go next.
Think in Two Modes
Camp mode: the object is displayed where you want to use or see it.
Travel mode: the object is secured, removed or relocated before the vehicle moves.
A small plant might live on a shelf at camp and travel in a secured container.
A decorative bowl might stay on the table while parked and move into a cabinet before departure.
A lamp may need a lower, more secure travel position.
Use Retention Methods Within Their Limits
Depending on the object and surface, people commonly use:
- removable hook-and-loop strips
- museum-style putty or wax
- non-slip liners
- small containment trays
- dedicated travel bins
These can reduce everyday shifting, but they should not be treated as a guarantee that an object will remain secure during every braking event, rough road or sudden maneuver.
Anything heavy, fragile or capable of becoming a projectile deserves a more conservative travel position.

Avoid Creating Twenty Tiny Departure Tasks
One plant takes seconds to move.
Twelve decorative objects scattered across shelves, counters and tables can turn departure into a scavenger hunt.
A simple renovation works better when most items either:
- stay safely secured in place, or
- move to one obvious travel-storage location.
The fewer decisions required on departure morning, the easier the RV is to use.
Upgrade 3: Mount Photos and Wall Art With Travel in Mind
Wall décor solves one advantage that tabletop décor does not: it can add personality without occupying a counter.
The challenge is that an RV wall moves, vibrates and may contain wiring, plumbing or lightweight construction that is very different from a residential wall.
Choose Lightweight Pieces
For a moving RV, consider:
- small lightweight frames
- acrylic glazing instead of heavy glass where appropriate
- fabric wall art
- thin prints
- lightweight signs
- low-profile decorative pieces
A heavy mirror or thick glass frame requires much more confidence in both the wall structure and the mounting method.
Use the Least Invasive Mounting Method That Works
Removable strips and other low-impact mounting methods can be useful for lightweight décor when they are compatible with the wall surface.
Test first.
RV interior panels can react differently to:
- adhesive
- heat
- humidity
- surface cleaners
- long-term pressure
Do not assume that an adhesive labeled removable on a residential wall will leave every RV finish unchanged.
Know What Is Behind the Wall Before Drilling
A screw or nail introduces a different set of questions.
Before drilling, understand the wall construction and verify that you are not entering an area containing:
- electrical wiring
- plumbing
- structural components
- slide-related hardware
- other concealed equipment
When that information is uncertain, use a mounting solution that does not require guessing what is behind the panel.
Travel-day test: Wall décor should remain secure through normal road movement without turning the RV wall into a hidden wiring or structural experiment.
Upgrade 4: Test Peel-and-Stick Materials Before Covering a Whole Wall
Peel-and-stick wallpaper, backsplash panels and decorative films are attractive RV renovation tools because they can transform a surface without major demolition.
An RV also exposes adhesive to conditions that a climate-controlled house may never experience.
Summer heat, winter storage, humidity and repeated vibration all matter.
Start With a Small Hidden Test Area
Before covering an entire wall, test the exact material on the exact RV surface.
Check:
- initial adhesion
- edge lifting
- bubbling
- reaction to heat
- cleanability
- how the original surface looks after removal
- whether adhesive residue remains
Give the test enough time to experience realistic temperature changes if possible.
Kitchen Areas Need Extra Thought
A backsplash near a cooking area has to deal with more than vibration.
Consider:
- heat exposure
- grease
- cleaning products
- moisture
- clearance from appliances
Follow appliance and RV manufacturer requirements around heat-producing equipment.

Keep Access Panels Accessible
A continuous decorative surface can make an access panel look less attractive, but permanently covering that panel may turn a future five-minute inspection into a removal project.
If the original RV provides removable access, preserve it.
Use seams, removable sections or another design that allows technicians and owners to reach the equipment behind the finish.
Upgrade 5: Keep the Headboard Lightweight and Inspectable
The wall behind an RV bed is often a good renovation target.
It is visually important, relatively small and can make a bedroom feel much less generic.
It is also an area where a decorative panel can accidentally hide something you may need later.
Check What the Wall Already Does
Before adding a headboard, inspect the area for:
- windows
- emergency-exit windows
- electrical outlets
- USB ports
- reading lights
- ventilation
- wall seams
- signs of condensation
- access to wiring or equipment
An emergency-exit window must remain accessible and usable.
Do not allow decorative fabric, panels or furniture to interfere with opening it.
Use Lightweight Construction
If you want a more architectural look, lightweight materials can often create the visual effect without adding thick hardwood or a heavy upholstered structure.
Potential approaches include:
- fabric panels
- tapestry
- thin decorative board
- lightweight slats
- removable wallpaper or wall covering
Whatever you use, make sure the mounting method is appropriate for the wall.
Plan for Future Inspection
Suppose a moisture stain appears behind the bed next year.
Can you still inspect the wall seam?
If a reading light fails, can you reach its wiring?
If a window seal needs attention, can the trim be removed without dismantling half the bedroom?
A good headboard decorates the wall while leaving future maintenance possible.
Travel-day test: Keep decorative headboards light, securely mounted and removable enough that windows, seams and service areas remain inspectable.
Upgrade 6: Treat Slide-Out Trim as Part of a Moving System
Replacing dated slide-out fascia can make a major visual difference because the original trim often occupies a large part of the room.
It is also one of the renovation areas where appearance needs to follow mechanical clearance.
The decorative trim may be stationary relative to part of the interior, but the slide-out itself is a moving system.
Observe the Complete Slide Cycle First
Before removing or adding material, watch the slide operate through its normal extension and retraction cycle.
Note the relationship between the trim and:
- moving slide structure
- seals
- flooring
- furniture
- wiring where visible
- tracks or other accessible mechanism components
- service and inspection points
Use the manufacturer's documentation for the installed slide mechanism when clearance requirements are involved.
Do Not Let Decorative Material Enter the Travel Path
New wood, fabric, fasteners or adhesive should not interfere with:
- slide movement
- seal compression
- rollers or tracks where applicable
- moving wiring
- inspection access
Even a small decorative change can become a mechanical problem when it occupies space the slide needs during movement.
Think About Fasteners
A longer screw can reach farther into the structure than the original fastener.
A heavier piece of trim may require a different mounting method.
Do not choose fastener length or placement by appearance alone.
Confirm what is behind the attachment point and whether the modification is compatible with the slide structure.

Keep It Easy to Inspect
The finished renovation should still allow you to look at:
- seals
- visible fasteners
- edges
- signs of water intrusion
- changes in slide alignment
If the new fascia makes inspection harder, revise the design while the renovation is still easy to change.
Upgrade 7: Create No-Decor Zones Around Driving and Safety Areas
Some areas of the RV benefit from a simple renovation rule:
Do not decorate across the function.
A hanging organizer may be attractive and useful until it covers a window. A plant may look good beside the driver's seat until it moves into the driver's sightline. A decorative panel may make an electrical compartment disappear visually and also make the reset switch harder to reach.
Mark the No-Decor Zones Before Renovating
| Area | What Must Remain Available |
|---|---|
| Driver position | Windshield, side windows, mirrors, controls and normal driving visibility |
| Emergency exits | Opening mechanism, clear approach and full usable exit path |
| Safety equipment | Fire extinguisher and other installed emergency equipment |
| Safety labels | Warning, operating and capacity information that needs to remain readable |
| Electrical area | Breakers, fuses, disconnects and service access |
| Ventilation | Air returns, vents and required airflow paths |
| Utility panels | Plumbing, electrical and appliance inspection points |
| Slide-outs | Movement, seal and service clearance |
Check the Driver's Seat After Every Front-Cabin Change
Sit in the normal driving position after installing:
- curtains
- window coverings
- phone mounts
- organizers
- plants
- decorative signs
Look through the windshield, both side windows and mirrors.
Then check again with the item in the position it might take after vibration or a turn.
A hanging object that stays outside the sightline while parked may swing into it while moving.
Keep Emergency Exits Obvious
An emergency window should not disappear behind:
- a fixed headboard
- decorative shelving
- storage boxes
- heavy curtains that restrict operation
- wall panels
Everyone who travels in the RV should know where the exits are and how they operate.
Travel-day test: If a renovation makes a driving view, emergency exit, warning label, control or inspection point harder to use, redesign that area before considering the project finished.
Upgrade 8: Add Flexible Visibility Without Rebuilding the RV
Some useful RV upgrades do not require replacing furniture or opening walls.
A flexible camera can add a selected rear or exterior view without turning the project into a major body modification.
The useful distinction is how you prefer to view that image.
Solar4 Wifi: Use the Phone or Tablet You Already Carry
Solar4 Wifi provides a live camera view on a compatible phone or tablet rather than requiring a separate dashboard monitor.
The camera connects locally to the device over WiFi, so the live view does not depend on cellular service or an external internet connection.
That can suit an RV renovation where the goal is to keep the dashboard relatively simple.
Depending on camera placement, it can provide a selected view such as:
- the rear of the RV
- a selected side-rear area
- a hitch or cargo area
- another nearby exterior reference point
The viewing device needs to remain within the camera's local WiFi connection range.
Solar-assisted charging supports the camera battery and remains supplemental charging.
Solar5B: Use a Dedicated Display
Some drivers prefer to keep the phone available for navigation, calls or another task.
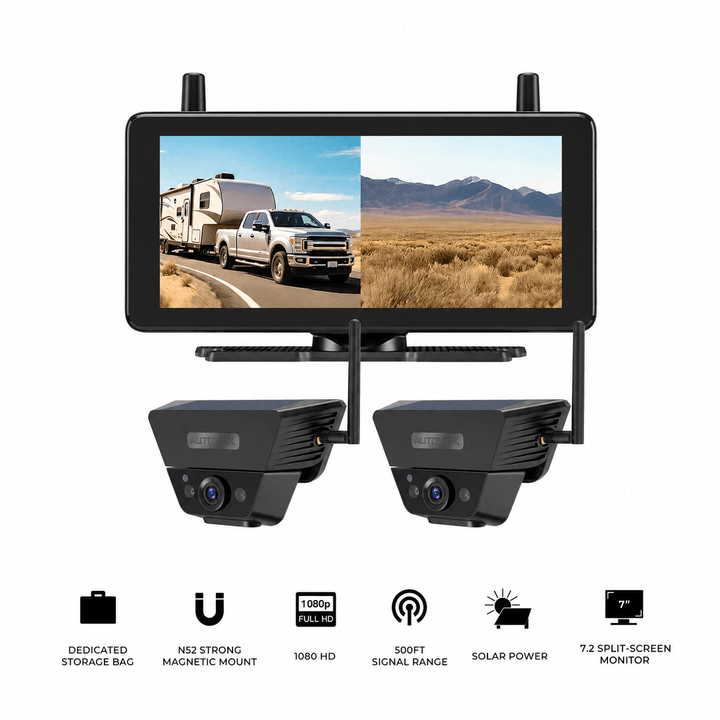
The Solar5B pairs a portable magnetic camera with its own display, creating a dedicated rear-view setup.
This can be useful for:
- backing into campsites
- checking a selected rear approach
- temporary or seasonal installations
- RVs where a portable setup makes more sense than a large installation project
The Solar5B Dual-Camera Kit can add a second movable camera angle when two selected views are more useful than one.
Keep the Role of the Camera Clear
A flexible camera is an additional visual tool.
It does not replace:
- mirrors
- direct observation
- walk-arounds
- a spotter where appropriate
- child supervision
- pet supervision
- physical inspection of the campsite
Solar4 Wifi should not be treated as a security or unattended child- or pet-monitoring system.
Camera images also provide visual references rather than exact physical clearance measurements.
Renovation angle: Visibility upgrades can be useful precisely because they may add a selected view without requiring a major interior rebuild. Choose between a phone-based local view and a dedicated display according to how the RV is actually used.
The Travel-Day RV Renovation Checklist
After finishing an upgrade, run this check before the next trip.
| Check | What to Confirm |
|---|---|
| Added weight | You understand what the renovation added and how it affects the loaded RV |
| Loose objects | Every plant, decoration and portable item has a secure travel position |
| Wall-mounted items | Frames, panels and décor remain securely attached |
| Cabinets and doors | All doors, drawers and latches operate normally |
| Slides | The complete extension and retraction paths remain clear |
| Windows | Normal windows and emergency exits still open as intended |
| Driver visibility | Windshield, side windows and mirrors remain unobstructed |
| Safety equipment | Emergency equipment and warning labels remain accessible |
| Service access | Electrical, plumbing, mechanical and appliance access points remain usable |
| Travel reset | The RV can move from camp mode to travel mode without a complicated packing process |
AUTO-VOX Options for Flexible RV Viewing
| Product | Viewing Style | Practical Fit |
|---|---|---|
| Solar4 Wifi | Phone / tablet local WiFi view | For users who prefer a live selected view without adding a separate dashboard display |
| Solar5B | Dedicated monitor | Portable rear-view setup for parking and campsite approaches |
| Solar5B Dual-Camera Kit | Dedicated monitor + two cameras | Main rear plus a movable second selected perspective |
| Solar5B AI | Dedicated monitor with Smart Reversing Assist | Additional low-speed reversing cues within the parking-guideline area |
Flexible Camera Options for RV Travel Days



Prices and configurations may change. Confirm the current product page, selected configuration, RV compatibility, mounting position and power requirements before purchase.
Common RV Renovation Mistakes That Show Up on Travel Day
Designing Only for Camp Mode
An RV spends time parked, but it also accelerates, brakes, turns and travels over imperfect roads.
Every loose item needs a travel position and every permanent installation needs to tolerate normal vehicle movement.
Adding Heavy Materials Without Reviewing Weight
Residential materials may be attractive because they feel substantial.
That same weight travels with the RV permanently.
Track large renovation additions and evaluate the loaded RV against its applicable ratings.
Giving Décor No Storage Position
If every departure requires finding a new place for plants, pillows and counter décor, the renovation creates work instead of simplifying the space.
Using Permanent Adhesive Before Testing the Surface
Test peel-and-stick products and mounting adhesives before covering visible areas.
Heat and long-term contact can change both adhesion and removal behavior.
Covering Inspection Panels
A smooth uninterrupted wall can look better in photos.
Electrical, plumbing and mechanical access remains more valuable when something needs inspection on the road.
Changing Slide-Out Trim Without Checking the Full Movement
Inspect extension, retraction, seals and service clearance before finalizing decorative slide modifications.
Blocking Visibility or Emergency Access
Keep the driver's sightlines, mirrors, windows, emergency exits, warning labels and safety equipment outside the decoration plan.
Frequently Asked Questions
How much weight can I add during an RV renovation?
There is no single safe renovation-weight allowance for every RV. Review the specific vehicle's GVWR, axle ratings and cargo information, account for passengers, water, fuel, gear and installed equipment, and use actual scale weights when needed to understand how the loaded RV is distributed. Large renovation projects deserve more weight planning than a few lightweight decorative changes.
Is peel-and-stick wallpaper safe for RV walls?
Compatibility depends on the wall finish, adhesive, temperature exposure, humidity and cleaning products. Test the exact product on a small inconspicuous section first, then check adhesion and removal before covering a larger area.
Can I hang regular glass picture frames in an RV?
They can add unnecessary weight and breakage risk in a moving vehicle. Lightweight frames and acrylic or other less fragile glazing are often easier to manage. Whatever material you choose, use a mounting method appropriate for the wall and normal RV vibration.
Can I replace the trim around an RV slide-out?
Decorative slide-out trim can be changed on many RVs, but the renovation must preserve movement clearance, seals and access to the installed mechanism. Observe the complete slide cycle and follow the RV or slide-system manufacturer's requirements before adding material or fasteners.
Can Solar4 Wifi work without internet?
Yes. Solar4 Wifi connects locally between the camera and a compatible phone or tablet, so the live view does not require cellular data or an external internet connection. The viewing device still needs to remain within the camera's local WiFi connection range.
Should I use an RV camera to watch children or pets inside the RV?
A backup camera should not be treated as a substitute for appropriate child or pet supervision. Solar4 Wifi is designed to provide a selected camera view and should not be relied on as an unattended caregiving or security system.
Final Thoughts: Renovate for the Road, Not Just the Campsite
An RV can feel personal without turning every travel day into a packing project.
The upgrades that usually work best share a few characteristics.
They add reasonable weight. Loose items have a travel position. Mounted items stay secure. Slides and doors keep their clearance. The driver keeps a clear view. Emergency exits remain accessible. Service panels can still be opened.
That gives you a simple renovation sequence:
- Choose lightweight materials where practical.
- Give every loose object a secure travel position.
- Mount wall décor for a moving environment.
- Test adhesives before making a large commitment.
- Keep decorative panels removable enough for inspection.
- Treat slide-out areas as moving mechanical spaces.
- Protect visibility, exits, labels and service access.
- Use flexible viewing upgrades when they fit the way you travel.
The best test comes after the renovation looks finished.
Bring the slides in. Close the cabinets. Put every loose object into travel mode. Sit in the driver's seat. Walk to each emergency exit. Open the service panels you may need later. Then imagine the first hard turn, uneven campground road and backing maneuver of the next trip.
If the RV still works naturally in that state, the renovation is doing more than looking good.
Before you finish any RV renovation, ask one final question: Will this upgrade still be secure, practical, visible, and easy to inspect when the RV is actually moving, turning, backing, and parking?


