


Getting an RV inside the campsite is only the first part of parking it.
The real goal is to put the rig in a position where everything that comes next actually works.
The slide-outs need room. The awning needs clearance. The entry steps need a usable landing area. The shore-power cord has to reach the pedestal, the freshwater hose needs a sensible path, and the sewer connection needs to work from the final position.
It is surprisingly easy to get one of those things wrong.
You back in, straighten the RV, put it in park and feel relieved that the driving day is finally over. Then you walk outside and realize the passenger-side slide is too close to a tree. Or the utility bay is several feet farther from the pedestal than expected. Or the awning would open directly toward a branch or picnic table.
At that point, every setup step you have already completed becomes something you may have to undo.
A smoother arrival starts a few minutes earlier.
Before leveling, connecting utilities or opening anything, confirm the campsite, walk the space and decide where the fully expanded RV needs to sit. Then back into that position slowly, secure the rig and move through the rest of the setup in a consistent order.
This checklist focuses on a full campground arrival rather than a quick overnight stop. The goal is a stable campsite setup that may stay in place for several nights.
Quick Navigation
- The Correct Setup Order
- 1. Confirm the Campsite
- 2. Walk the Site
- 3. Plan the Expanded Footprint
- 4. Choose Your Backing Views
- 5. Add a Useful Second View
- 6. Use Smart Reversing Assist
- 7. Back In Slowly
- 8. Secure and Level the RV
- 9. Check and Connect Utilities
- 10. Recheck Before Opening Slides
- 11. Complete the Final Walk-Around
- Full RV Parking Checklist
- Frequently Asked Questions
Important: RV leveling, stabilizing, chocking, utility hookup and slide-out procedures vary by vehicle. Follow the instructions for your motorhome, travel trailer, fifth wheel, leveling system and campground. Camera systems provide additional views during parking while mirrors, direct observation, spotters and physical site checks remain part of the process.
Quick Answer: What Should You Do Before Setting Up an RV Campsite?
A good campsite setup follows a simple sequence: understand the space first, park the RV second, then begin the mechanical setup.
| Stage | Main Question |
|---|---|
| Confirm the site | Is this the correct campsite, and are there site-specific rules or limits? |
| Walk the site | Where are the trees, posts, utilities, slopes and ground hazards? |
| Plan the footprint | Will slides, awning, steps and exterior doors have enough room? |
| Choose the backing line | Where should the wheels and rear of the RV finish? |
| Select views | Which rear or side area is hardest to judge from the driver's seat? |
| Back in | Can the maneuver continue slowly and clearly from the current angle? |
| Secure and level | Is the RV in its final position and ready for the manufacturer's setup sequence? |
| Connect utilities | Are the power, water and sewer connections suitable and within reach? |
| Expand the RV | Has exterior clearance been checked again before opening slides and awning? |
| Final walk-around | Are cables, hoses, chocks, doors and shared paths arranged safely? |
The biggest time saver is getting the final parking position right before the leveling and hookup work begins.
Step 1: Confirm the Site Before You Start Backing
Campgrounds can be busy at arrival time. It is easy to follow the loop road, see an open site and start lining up before checking the details.
Take a moment first.
Confirm:
- campsite number
- assigned entry direction
- one-way campground roads
- site length
- check-in instructions
- parking boundaries
- generator or quiet-hour rules
- restrictions on awnings or outdoor equipment
- where the RV is expected to sit within the site
Look at the Ground Before Putting the RV on It
A gravel or dirt campsite may look level from the road and still have a soft shoulder, drainage dip or washed-out area near one side.
Heavy RVs place significant loads through the tires, jacks and leveling equipment. The usable parking surface should feel firm and appropriate for the rig.
If one part of the site looks unusually soft, muddy or unstable, check with campground staff before positioning the RV there.
This first step takes very little time and prevents the frustrating experience of getting fully lined up with the wrong site or an unsuitable parking area.

Step 2: Walk the Campsite Before the RV Moves Into Position
A campsite looks different on foot than it does through a windshield.
Walking the space before backing gives you a chance to identify the obstacles that will matter later.
Start near the entrance and follow the approximate path the RV will take.
Look Low, Mid-Level and High
At ground level, check:
- rocks
- wheel stops
- tree roots
- drainage dips
- soft ground
- sewer connections
- uneven areas that may affect leveling
At mid-height, check:
- utility pedestals
- water spigots
- posts
- picnic tables
- fire rings
- fences
- neighboring vehicles
- neighboring slide-outs
Above the RV, check:
- low branches
- roof clearance
- awning clearance
- anything extending over the campsite
Walking the site also helps you choose a spotter position. The spotter needs a place with a useful view while remaining visible to the driver and clear of the RV's path.
What to remember: Walk the route the RV will actually take and check the space at ground, body and roof height.
Step 3: Plan for the RV After Everything Opens
The RV body may fit neatly between the campsite boundaries while the fully set-up RV does not.
Before backing, picture the vehicle after the slides, steps and exterior equipment are in use.
| Component | What to Check Before Parking |
|---|---|
| Slide-outs | Trees, posts, utility equipment, neighboring RVs and site boundaries |
| Awning | Branches, picnic table, fire ring, neighboring awning and usable outdoor space |
| Entry steps | Ground level, pedestrian path and campsite edge |
| Entry door | Clear opening path and comfortable access |
| Storage doors | Pedestal, table, neighboring vehicles and utility equipment |
| Outdoor kitchen | Opening clearance and usable standing space |
| Utility bay | Reasonable access to shore power, water and sewer |
Think About Both Sides of the RV
The driver's side often carries the utility connections. The passenger side may contain the main entry door, awning and outdoor living area.
Moving the RV twelve inches in one direction can improve one side and create a problem on the other.
That is why the final parking position should consider the complete campsite rather than one obstacle at a time.
Check Utility Reach Before You Commit
If the pedestal, water spigot or sewer inlet is unusually far from the expected utility bay, notice that before the wheels settle into their final position.
You may still choose the same spot, but you will know whether the normal cords and hoses can reach without being stretched across an awkward path.
What to remember: Park for the RV you will live in after the slides, steps and outdoor equipment are open.
Step 4: Decide What You Need to See Before Backing
Once the campsite footprint is clear, decide which areas deserve the most attention during the backing maneuver.
For many sites, the main questions are:
- Where is the final rear stopping point?
- How close is the passenger-side rear corner to the pedestal or tree?
- Is the driver-side edge staying inside the parking area?
- Where is the picnic table relative to the swing of the RV?
- Can the spotter remain visible throughout the maneuver?
The mirrors provide the core driving references. A rear or secondary camera view can add context around one of the areas that is harder to judge from the driver's seat.

Choose the Second View Based on the Campsite
For one site, the difficult area may be the passenger-side rear corner next to a utility pedestal.
At another site, the main concern may be the hitch or lower rear area near a retaining wall.
At a third site, the challenge may simply be knowing where the rear bumper should stop without losing the larger view behind the RV.
The most useful second camera position changes with the campsite.
Step 5: Add a Second View Where the Campsite Needs It Most
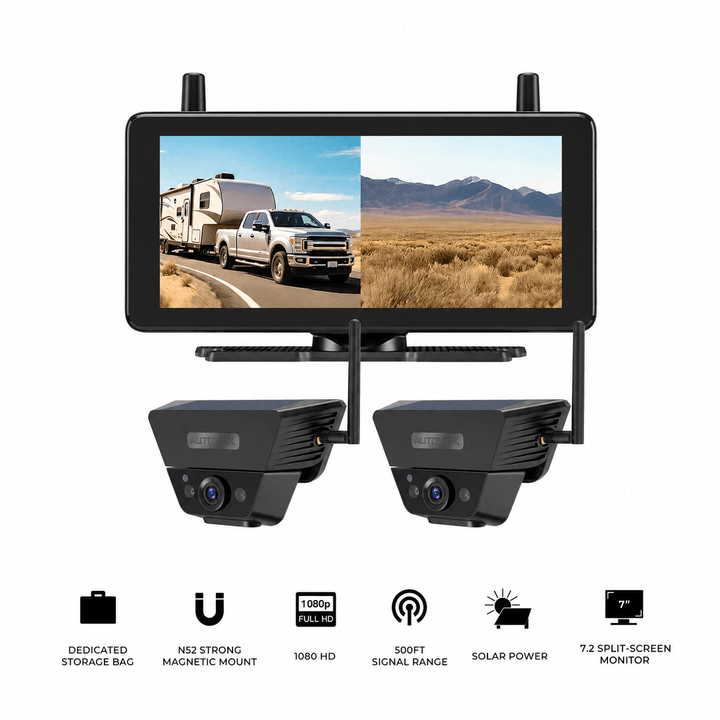
A portable dual-camera setup gives the driver some flexibility when the difficult area changes from one campsite to another.
The Solar5B Dual-Camera Kit pairs a dedicated monitor with two magnetic cameras.
One camera can provide the main rear view while the second camera covers a selected area such as:
- the passenger-side rear corner
- a utility pedestal
- the hitch area
- a lower rear reference point
- the edge of a narrow campsite
The second view is most useful when it adds information that the first camera and mirrors do not already show clearly.
Positioning still depends on the vehicle, mounting surface and the area you need to see.
The cameras do not calculate the exact distance to an obstacle. Use the image as another visual reference and confirm uncertain clearance directly.
What to remember: Give the second camera one specific job based on the campsite in front of you.
Step 6: Use Smart Reversing Assist as an Additional Backing Cue
Some campsite backing situations involve more than fixed objects.
People may walk through the campground road. A neighboring vehicle may move. Children or other campers may enter an area that looked clear a few moments earlier.
Solar5B AI includes Smart Reversing Assist, which detects people and vehicles within the parking guideline area.
In single-screen mode, the system can display visual detection boxes and provide audible alerts when a person or vehicle is detected within that area.
In dual split-screen mode, detected people and vehicles can still be highlighted visually, while the audible alert is unavailable.
Smart Reversing Assist boundary: The feature is designed around people and vehicles detected within the parking guideline area. It does not measure exact clearance, steer, brake or park the RV. Rocks, branches, posts, curbs and other campsite obstacles still require normal visual checks.
The dual-camera option can also provide two selected camera perspectives during campsite parking. The practical value of the second camera remains the additional view itself.
Mirrors, direct observation and a spotter continue to provide information outside the camera frame.
Step 7: Back In Slowly and Reset Whenever the View Becomes Unclear
Backing an RV into a campsite rarely needs to look perfect.
It needs to stay controlled.
Drivers sometimes reach the halfway point of a backing maneuver and feel committed to finishing from the current angle. That can turn a small alignment issue into a series of larger corrections.
A pull-forward is a normal part of backing.
If the angle starts to feel wrong:
- stop
- pull forward
- straighten the RV
- reposition the spotter
- walk the site again if necessary
- begin the next correction from a clearer angle
Keep Spotter Communication Simple
One primary spotter usually makes communication easier.
Before backing, agree on:
- a clear stop signal
- which side the spotter will watch
- where the spotter should stand
- how the spotter will communicate distance or direction
The driver should be able to see the spotter. If the spotter disappears from view, stop the RV and re-establish visual contact.
The camera can provide another perspective while the spotter watches the area that requires direct attention.

Large RVs May Benefit From More Rear and Side Context
A larger Class A, Class C, fifth wheel or long travel trailer may have several areas that matter during campground turns and backing.
The CampSync D1 uses three cameras and four lenses: one dual-lens rear camera plus left and right side cameras.
The dual rear lenses can provide farther and closer rear perspectives, while the side cameras add left- and right-side context.
This type of layout can be useful when a larger rig regularly moves through tight campground loops, angled sites and narrow entrances.
Wireless refers to video-signal transmission. The camera system and display still require their supported power connections.
What to remember: A clean pull-forward and reset is usually easier than forcing a poor backing angle to work.
Step 8: Secure the RV Before Moving Into the Setup Stage
Once the RV reaches its final parking position, the driving part of the arrival is finished.
Now the setup procedure begins.
Follow the securing and leveling sequence specified for the RV and leveling system you use. Motorhomes, travel trailers and fifth wheels can have different procedures.
Common Items to Address
Depending on the rig, the sequence may include:
- parking brake where applicable
- tow vehicle position
- wheel chocks
- leveling blocks
- manual or automatic leveling system
- stabilizers
- hitch or landing-gear procedures
Leveling and Stabilizing Serve Different Purposes
Leveling brings the RV into the correct position from side to side and front to back.
Stabilizing reduces unwanted movement once the RV is parked.
The equipment and sequence vary by vehicle, so follow the manufacturer's instructions for the exact system installed on the rig.
Confirm the Position Before Doing Too Much Work
Take one last look at the campsite before completing a long leveling process.
Check the slide clearance, utility reach and outdoor space again.
This is the last easy opportunity to move the RV a few inches or make another parking correction.
Step 9: Check the Hookups Before You Connect Anything
Once the RV is secure and positioned according to its setup procedure, turn your attention to the utilities.
Start by looking at the complete hookup area.
Make sure the cords and hoses can reach without creating unnecessary tension or awkward paths around the campsite.
Shore Power
Before connecting, check:
- the pedestal's condition
- the service available at the campsite
- the service required by the RV
- the shore-power cord and connectors
- visible heat damage, cracks or looseness
- appropriate surge protection or electrical management equipment
Electrical protection can help identify or respond to conditions beyond storm-related surges, depending on the device. Check the specifications of the equipment you use.
If the pedestal appears damaged or the protection device reports a fault, contact campground staff before continuing.
Fresh Water
For a city-water connection, check:
- the campground spigot
- the RV inlet
- potable-water hose condition
- a suitable water-pressure regulator
- filter connections where used
Follow the RV and plumbing manufacturers' pressure guidance.
Turn the water on gradually and check the outside fittings and interior plumbing for leaks.

Sewer Connection
Check the location and condition of the sewer inlet before laying out the hose.
Keep the connection secure, follow campground rules and route the hose in a way that keeps the campsite usable.
The important parking question is simple: can the final RV position serve the utilities comfortably?
What to remember: Confirm the RV's final position and utility reach before turning the campsite into a network of cords and hoses.
Step 10: Check the Outside One More Time Before Opening the Slides
The campsite looked clear when you first walked it.
Now the RV is parked, leveled and connected. It is worth walking outside once more before opening the slide-outs.
The final position may be slightly different from the one you imagined during the first site walk.
Stand Beside Each Slide-Out
Check the complete extension area for:
- trees
- branches
- posts
- utility pedestal
- water connections
- picnic table
- neighboring RVs
- neighboring slide-outs
- people and campsite gear
Use the actual slide extension dimensions for your RV rather than relying on a universal clearance estimate.
Check the Awning Area Separately
The awning uses a different part of the campsite.
Look at:
- branches above it
- neighboring awnings
- picnic tables
- fire rings
- site boundaries
- current wind conditions
- pedestrian paths
The entry steps and exterior storage doors deserve the same quick check. A technically open campsite can still become awkward if a step lands near a slope or a storage door cannot open past the pedestal.
Step 11: Finish Setup With One Complete Walk-Around
The RV is parked. Utilities are connected. Slides are open.
Take one last lap around the campsite before settling in.
Wheels and Ground
- wheel chocks correctly positioned
- leveling blocks stable
- jacks or leveling equipment positioned as required
- ground around the RV still looks stable
Utilities
- shore-power cable has a sensible path
- freshwater hose is secure
- water connections are dry
- sewer hose is secure where connected
- cords and hoses do not create avoidable trip hazards
RV Exterior
- slide-outs have clear space
- awning has suitable clearance
- entry steps have a stable landing area
- storage compartments can open
- doors and outdoor equipment remain usable
Shared Campsite Space
- neighboring campsite remains clear
- campground road is unobstructed
- pedestrian paths remain usable
- picnic and outdoor areas have enough room
This final lap catches the little details that are easy to overlook once everyone starts carrying chairs, food and gear outside.
RV Campsite Parking and Setup Checklist
| Order | What to Do |
|---|---|
| 1 | Confirm campsite number, entry direction and site rules |
| 2 | Walk the campsite before backing |
| 3 | Check ground condition, slope and overhead clearance |
| 4 | Plan space for slides, awning, steps and exterior doors |
| 5 | Locate power, freshwater and sewer hookups |
| 6 | Choose the main rear and secondary viewing areas |
| 7 | Back in slowly with mirrors, direct observation and a spotter as needed |
| 8 | Pull forward and reset whenever the angle becomes unclear |
| 9 | Confirm the RV is in its final position |
| 10 | Secure the RV according to the manufacturer's procedure |
| 11 | Level and stabilize according to the installed system |
| 12 | Inspect shore power before connecting |
| 13 | Connect freshwater with suitable pressure regulation |
| 14 | Connect sewer where applicable and allowed |
| 15 | Walk outside and recheck slide and awning clearance |
| 16 | Open slides and awning as conditions allow |
| 17 | Complete one final campsite walk-around |
Which AUTO-VOX Setup Fits Campsite Parking?
| Product | Useful For | Viewing Role |
|---|---|---|
| Solar5B AI | Slow campsite backing with an optional second camera | Rear / selected second view plus Smart Reversing Assist within its supported area |
| Solar5B Dual-Camera Kit | Flexible campsite positioning | Main rear + movable second perspective |
| CampSync D1 | Larger motorhomes, fifth wheels and longer rigs | Farther/closer rear + left/right side context |
| Solar5B | Straightforward portable rear-view needs | Single magnetic rear view with dedicated monitor |
Camera Options for RV Campsite Parking



Prices and configurations may change. Confirm the current product page, vehicle compatibility, selected package, mounting method and power requirements before purchase.
Common RV Campsite Parking Mistakes
Backing In Before Walking the Site
A two-minute site walk can reveal branches, pedestals, soft ground and slope changes that are difficult to judge from the driver's seat.
Parking for the Closed RV Footprint
The final position needs to accommodate slide-outs, awning, steps, doors and exterior storage access.
Trying to Finish the Backing Maneuver in One Attempt
Pull forward whenever the angle stops working. A short reset can turn a difficult correction into a straightforward approach.
Watching Only the Center Behind the RV
The passenger-side rear corner, pedestal, campsite edge and hitch area can matter just as much as the center rear view.
Starting the Leveling Process Too Early
Confirm the footprint, slide clearance and utility reach before investing time in the final leveling procedure.
Connecting Utilities Before the RV Is Settled
Moving the RV after shore power, water and sewer are connected creates unnecessary work and can put stress on hoses or cables.
Opening Slides Without a Final Exterior Check
Walk beside each slide before opening it and check the actual extension area again.
Skipping the Final Walk-Around
The last lap catches loose connections, awkward cable routes, blocked paths and exterior equipment that needs another adjustment.
Frequently Asked Questions
What should I check before backing into an RV campsite?
Confirm the campsite, walk the backing path and check ground condition, branches, posts, utilities, picnic tables, neighboring RVs and the space required for slides, awning and steps. It also helps to decide where the RV should finish before the backing maneuver begins.
Should I level an RV before connecting utilities?
In many setups, the RV reaches its final parking position and goes through the appropriate securing and leveling sequence before the full utility hookup begins. The exact order can vary between motorhomes, travel trailers, fifth wheels and leveling systems, so follow the manufacturer's procedure for your rig.
How much room should I leave for RV slide-outs?
Use the actual extension dimensions of the slide-outs on your RV and check the full exterior area before opening them. Trees, posts, pedestals and neighboring RVs can all affect usable clearance.
Can a second backup camera help when parking an RV?
Yes. A second camera can provide another selected view, such as the passenger-side rear corner, utility pedestal, hitch or lower rear area. It works best when the second angle provides information that the mirrors and main rear camera do not already show clearly.
What does Solar5B AI Smart Reversing Assist detect?
Smart Reversing Assist detects people and vehicles within the parking guideline area. In single-screen mode, it can provide visual detection boxes and audible alerts. In dual split-screen mode, visual highlighting remains available while the audible alert is unavailable.
Can a backup camera tell me the exact distance to an obstacle?
A camera image and parking guidelines provide visual references. They do not provide an exact physical clearance measurement. Stop and check directly whenever the available space is uncertain.
Final Thoughts: Make the Setup Order Repeatable
A campground arrival feels much easier when everyone knows the order.
First confirm the site.
Then walk it.
Plan where the fully expanded RV needs to sit. Check the utility locations. Decide which rear and side areas need the most attention. Back in slowly and reset whenever the angle becomes unclear.
Once the RV reaches its final position, move into the vehicle's securing and leveling procedure. After that, check the utilities, connect them carefully and walk outside again before opening the slides and awning.
Finish with one complete lap around the campsite.
The whole process can be summarized in a simple sequence:
- Confirm the site.
- Walk the campsite.
- Plan the expanded footprint.
- Choose the backing line and useful views.
- Back in slowly.
- Secure the RV.
- Level according to the vehicle's procedure.
- Check and connect the utilities.
- Recheck exterior clearance.
- Open slides and awning as appropriate.
- Complete the final walk-around.
Save this checklist for the next campground arrival. A consistent sequence makes it easier to catch small problems while they are still easy to fix.
Park, secure, level, connect, expand and check once more before settling in. If rear or side visibility is one of the difficult parts of your campsite setup, choose an AUTO-VOX camera configuration that matches the vehicle length and the areas you actually need to see.


