


A horse trailer camera has two very different jobs.
One camera can help you see behind the trailer when backing into a showground, turning through a tight gate, or checking the traffic following the trailer. Another can face inward so you can see how the horse is standing and whether something inside the stall area has changed during the trip.
Trying to do both jobs with one camera usually means compromising one of the views.
An exterior rear camera needs to see beyond the back of the trailer. An interior camera needs to see into a dark, enclosed space filled with dividers, horses, hay, and trailer hardware. The mounting positions, lighting conditions, wireless signal path, and power requirements can all be different.
This becomes more important with aluminum and steel horse trailers. Wireless specifications are often measured in open conditions, while a real installation may place the camera behind metal walls, a tack room, a trailer bulkhead, and the cab of the tow vehicle.
A good horse trailer camera setup therefore starts with three questions:
Do you need a rear view, an interior view, or both? How will the signal reach the tow vehicle? And how will each camera stay powered for the full trip?
Quick Navigation
Horse-travel reminder: A live camera provides additional visual information during transport. It cannot diagnose a horse's condition, confirm that every piece of trailer equipment remains secure, or replace scheduled stops and direct physical checks. If something on screen looks wrong, stop in a safe location before inspecting the horse or trailer.
Rear View, Interior Monitoring, or Both?
The first decision is where the missing visibility actually is.
Drivers who already have good tow mirrors may still want a view directly behind the trailer. Other owners care more about seeing the horse during a long drive. For many regular haulers, one exterior rear camera and one interior camera create the most versatile setup.
| Camera Setup | Primary Job | Main Limitation |
|---|---|---|
| Exterior rear camera | Backing, rear traffic, trailer positioning | Does not show what is happening inside |
| Interior camera | Observe horse position and stall area | Does not improve the view behind the trailer |
| Rear + interior dual-camera setup | Combines towing visibility and interior observation | Requires two suitable mounting positions and reliable signal from both |
| Two interior cameras | More complete view of a divided or multi-horse interior | Leaves exterior rear visibility to mirrors or another camera |
Where to Mount the Exterior Rear Camera
For a typical backup camera for trailer setup, the rear camera is usually most useful high and near the center of the trailer.
A higher position can provide a longer view behind the trailer and keeps the lens farther away from road spray and mud than a very low bumper-level camera.
The final position should account for:
- rear doors or ramp movement
- door hinges and latches
- license plate and lights
- roof overhang
- camera power or charging access
- the desired downward angle
It can be useful to keep a small portion of the trailer rear edge visible at the bottom of the image. That gives the driver a reference for where the trailer ends.
A camera mounted for rear traffic will usually show a different perspective from a close-range hitch camera. Decide which view matters before fixing the angle.
During driving, a rear camera can add context about the road directly behind the trailer. Tow mirrors remain the primary tool for side clearance and lane changes.
Where to Mount the Interior Camera
An interior horse-trailer camera generally works best from a high position where the horse cannot easily reach it.
Possible locations include an upper front or rear corner, depending on trailer layout and stall orientation.
The useful view should include as much of the horse and occupied stall area as practical without placing the camera or wiring in a kick, chew, or contact zone.
Before mounting, check that the camera does not interfere with:
- roof or side vents
- dividers
- doors
- escape doors
- hay bags or feeders
- tie points
- lighting
Secure every mount for trailer vibration. Loose brackets, cables, or accessories have no place within reach of a horse during transport.
One Interior Camera May Not Show Everything
A wide-angle camera can cover a large part of the trailer, but dividers and the horses themselves can block parts of the scene.
For a straight-load or slant-load trailer carrying more than one horse, stand in the proposed camera position before installation and look at what will actually be visible once the animals and dividers are in place.
If your priority is observing two separate stalls, two interior angles may provide more useful information than one very wide image.
If your priority is balancing horse observation with towing visibility, one exterior rear camera and one interior camera usually makes better use of a two-camera system.
Placement rule: Assign one clear job to each camera. A rear camera should show the road and backing area; an interior camera should show the occupied stall area without becoming another object the horse can reach.
Wireless Signal and Power Inside a Metal Horse Trailer
Wireless installation is attractive on a horse trailer because it can reduce the amount of wiring that has to run from the trailer into the tow vehicle.
The trailer itself creates the main challenge.
Metal Can Change the Real Wireless Range
Published wireless ranges are useful for comparing systems, but they should be treated as open-condition references.
A horse-trailer installation can place several obstacles between the camera and monitor:
- steel or aluminum trailer walls
- a front bulkhead
- a tack room
- the trailer nose
- the bed of the tow vehicle
- the truck cab
Metal can attenuate and reflect a 2.4 GHz wireless signal, so a camera advertised for several hundred feet in open space may behave differently from a camera sealed inside a trailer only thirty feet from the monitor.
Bumper-pull and gooseneck trailers can also create different signal paths. A long gooseneck with a front dressing or tack area may put more structure between an interior camera and the truck than a shorter bumper-pull trailer.

Test the Actual Trailer, Not the Box Specification
The most useful wireless test happens with the complete towing combination assembled.
Before loading a horse:
- Mount or temporarily position the camera where you intend to use it.
- Close the horse-trailer doors.
- Close the tack room or dressing-area doors.
- Place the monitor or phone in its normal position inside the tow vehicle.
- Confirm the image remains stable.
- Check both cameras if using a dual-camera system.
If possible, perform an empty-trailer road test with a passenger watching the monitor while the driver stays focused on driving.
Check for signal changes during turns and on the road rather than assuming a strong stationary driveway connection will behave identically in every condition.
Camera Position Can Affect Signal as Well as View
An interior camera mounted at the very rear may have a longer and more obstructed path to the tow vehicle than one mounted closer to the trailer front.
Moving it forward can sometimes improve the signal path, provided the new angle still shows the area you need.
Do not trade away a useful horse view just to move the camera a few feet. The goal is a position that works visually and wirelessly.
Dedicated Wireless Monitor vs. Phone-Based WiFi
Two common wireless designs work differently.
A digital wireless backup camera system typically sends video directly to a dedicated monitor in the tow vehicle. This keeps the camera image separate from navigation and other phone functions.
A local WiFi camera such as Solar4 Wifi sends the live image to a compatible phone or tablet. The camera creates a local connection, so external internet and cellular data are not required.
Phone-based viewing can reduce dashboard hardware, but consider how the phone is already being used. If it provides navigation during the trip, a dedicated camera monitor may be easier for frequent live viewing.
The driver should not manipulate a phone or camera app while driving. Use an appropriate mounted display arrangement and follow applicable distracted-driving rules.
Battery Power vs. Trailer Power
A rechargeable camera has an important advantage inside a horse trailer: it can avoid running a loose power cable through the horse compartment.
The tradeoff is runtime.
Before each trip, confirm:
- camera battery level
- expected travel time
- how the camera will be recharged
- whether the monitor has reliable power in the tow vehicle
Solar-assisted charging helps when the solar panel receives suitable sunlight.
An interior camera inside a closed horse trailer may receive little or no useful sunlight, so solar assistance should not be counted on as the main charging plan for that camera.
Charge an interior rechargeable camera before departure.
A fixed 12V camera can be a better fit for frequent long-distance hauling when continuous power is important. In that case, use a supported power source and route wiring securely where horses, doors, dividers, and moving equipment cannot contact it.
Wireless rule: The advertised range tells you what the radio can do under favorable conditions. The assembled truck-and-trailer combination tells you whether the system works in your installation.
Why a Dual-Camera Horse Trailer Setup Often Makes Sense
A dual-camera system is particularly useful on a horse trailer because the two most important views face in opposite directions.
The exterior camera looks away from the trailer.
The interior camera looks into it.
A Practical Rear + Interior Layout
| Camera | Suggested Role | What to Check |
|---|---|---|
| Camera 1 | Exterior rear view | Road behind trailer, backing area, rear edge reference |
| Camera 2 | Interior horse view | Horse position, stall area, divider and surrounding equipment |
This layout allows a single monitor to handle two different parts of the trip.
During normal towing, the rear image can provide additional road context. The interior image can be selected periodically to observe the horse.
When backing, the rear view becomes the priority.
If the monitor supports split screen, both feeds can remain visible at once.
Split Screen or Full Screen?
A 7-inch-class monitor is useful with two cameras because each feed still has meaningful screen space in split mode.
Split screen is useful for general awareness. Full-screen mode makes more sense when you need to inspect one camera view in greater detail.
For example:
- use rear full screen while reversing
- use split screen during slow maneuvering when both areas matter
- switch to interior full screen when checking the horse
A camera monitor should remain an occasional visual reference during driving. The driver's attention belongs primarily on the road, mirrors, and surrounding traffic.
Night Vision Matters More Inside Than Many Buyers Expect
A horse trailer can become dark even during daytime travel.
Closed doors, small windows, partitions, and changing road light can create much lower illumination than the tow vehicle cabin.
An interior camera with infrared night vision can maintain a usable monochrome image in low light.
Test night vision after installation with the trailer closed.
Reflective metal surfaces or nearby hardware can create IR glare if the camera points directly at them. A small change in camera angle can improve the image substantially.
1080P Is Usually More Useful Than Chasing Resolution Alone
Clear video helps distinguish the horse's posture, divider position, and stall area, but trailer monitoring is not a home-surveillance resolution contest.
Signal stability, camera angle, night performance, and screen readability matter just as much as the resolution number.
A stable 1080P live feed from a well-positioned camera is more useful during transport than a higher-resolution camera with an unreliable connection.
Rear Camera Visibility Still Has Limits
An exterior rear camera supplements tow mirrors and normal observation.
It cannot confirm exact clearance or replace getting out to inspect the trailer during a difficult backing maneuver.
Likewise, an interior camera cannot confirm that:
- a divider latch is fully secured
- the floor remains structurally sound
- the horse is medically well
- the trailer is correctly ventilated
- all tack and equipment remain properly fastened
Those still require direct inspection.

Horse Trailer Camera Installation and Pre-Trip Checklist
A horse trailer adds one installation requirement that ordinary cargo trailers do not have: every component inside must be positioned with the animal in mind.
Before Final Mounting
Power the system and pair every camera first.
Then check:
- rear camera angle
- interior field of view
- night-vision image
- split-screen mode
- wireless signal with all doors closed
- monitor position in the tow vehicle
Only complete the permanent mounting after the views and connection are working.
Interior Mounting Checklist
- Mount the camera above normal horse reach.
- Keep brackets smooth and securely tightened.
- Keep cords and charging cables outside kick and chew areas.
- Do not block vents or airflow.
- Keep escape doors and access points clear.
- Check the divider through its full operating range.
- Confirm hay bags and other equipment cannot strike the camera.
- Recheck the mount periodically for vibration loosening.
Exterior Mounting Checklist
- Keep the camera clear of doors, ramps, and hinges.
- Confirm the trailer rear is visible enough to provide orientation.
- Check that lights and the license plate remain unobstructed.
- Protect the lens from unnecessary road spray where possible.
- Secure any power cable away from sharp edges and moving parts.
- Confirm the camera remains attached before every trip.
Test Before Loading the Horse
A complete pre-trip camera test should include the trailer exactly as it will be towed.
| Check | What to Confirm |
|---|---|
| Interior image | The occupied stall area will be visible |
| Rear image | The road and backing area are framed correctly |
| Signal | Both feeds remain stable with trailer and truck doors closed |
| Night vision | Interior hardware does not create excessive IR glare |
| Battery | Rechargeable cameras have enough charge for the planned trip |
| Monitor | Mounted where the driver can glance without blocking normal sightlines |
| Physical trailer | Hitch, chains, brakes, tires, floor, dividers, doors, vents and lights checked directly |
Once horses are loaded, perform the normal trailer and horse checks again.
If the interior image shows unusual movement or something that concerns you during the trip, find a safe location to stop before investigating.
Pre-trip rule: Test the camera system before the horse becomes part of the troubleshooting process. Pair, position, close the trailer, verify the signal, and confirm battery capacity ahead of departure.
AUTO-VOX Camera Options for Horse Trailers
Different horse-trailer setups benefit from different viewing and power arrangements.
| Product | Camera Setup | Horse-Trailer Use |
|---|---|---|
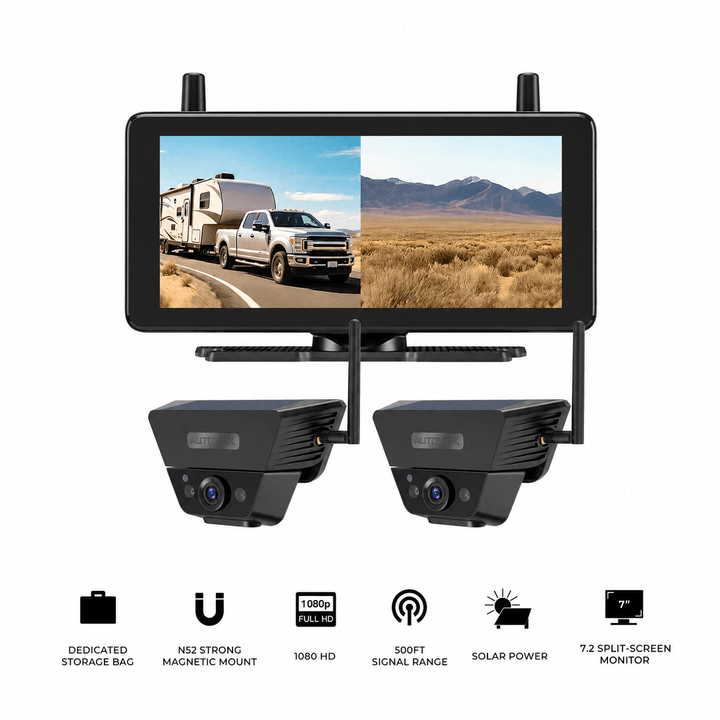
| Solar5B Dual-Camera Kit | 2 magnetic cameras + 7.2" monitor | Rear exterior + interior dual-view setup |
| Solar5C Dual | License-plate camera + magnetic camera | Fixed rear position + flexible second trailer view |
| Solar4 Wifi | 1 magnetic camera + phone/tablet view | Portable selected view without a separate monitor |
| Solar5B | 1 magnetic camera + 7.2" monitor | Single rear or interior view |
Solar5B Dual-Camera Kit
The Solar5B Dual-Camera Kit combines two rechargeable magnetic cameras with a 7.2-inch monitor and dual split-screen support.
For a horse trailer, one possible arrangement is:
- camera one at the trailer rear
- camera two mounted securely inside the trailer
Both cameras provide 1080P video and infrared night vision, which is especially useful for the darker interior view.
The cameras use 2.4 GHz digital wireless transmission. Signal performance should be tested through the actual metal trailer and tow vehicle before relying on the setup for a trip.
An interior camera will receive little solar input, so charge it before departure rather than relying on solar assistance inside the trailer.
Solar5C Dual
Solar5C Dual uses one license-plate-mount camera plus a second magnetic camera and a 7.2-inch split-screen display.
This layout can suit a trailer where the rear license-plate area provides a practical exterior camera location while the magnetic camera handles another selected view.
As with any interior installation, confirm the magnetic camera is securely mounted away from horse contact and remains stable under trailer vibration.
Solar4 Wifi
Solar4 Wifi provides a 1080P live view on a compatible phone or tablet through AUT VIEW.
Its local WiFi connection works without cellular coverage or external internet, which can be useful on rural routes and at showgrounds with poor mobile service.
The phone or tablet must remain within the camera's local WiFi connection range. AUTO-VOX notes that real-world range can vary with vehicle structure, obstacles, and wireless interference, making an actual closed-trailer test particularly important with a metal horse trailer.
Phone-based viewing also uses the same device many drivers rely on for navigation, so consider how frequently the camera feed needs to remain visible.
Camera Options for Horse Trailer Rear and Interior Views


Prices and configurations may change. Confirm the current product page, selected package, trailer compatibility, mounting surface, battery condition, and expected wireless performance before purchase.
Frequently Asked Questions
Do I need one or two cameras for a horse trailer?
One camera can work when you have one clear priority. An exterior rear camera helps with backing and rear visibility, while an interior camera lets you observe the horse compartment. A two-camera system is useful when you want both views during the same trip.
Will a wireless camera work inside a metal horse trailer?
It can, but metal walls, partitions, trailer length, the tack area, and the tow vehicle can reduce or disrupt wireless performance. Test the camera with the trailer closed and the complete towing combination assembled. Published open-condition range should not be treated as guaranteed in-trailer range.
Where should an interior horse trailer camera be mounted?
A high corner that shows the occupied stall area is usually a practical starting point. Keep the camera and any wiring securely outside normal kick, chew, and contact areas. Do not obstruct vents, dividers, doors, escape routes, or other trailer equipment.
Do horse trailer cameras need internet?
It depends on the system. Dedicated digital wireless systems communicate directly with their monitor and do not require internet. Solar4 Wifi uses a local WiFi connection between the camera and phone or tablet, so it can provide a live feed without cellular service or external internet.
How should I power a camera inside a horse trailer?
A rechargeable camera can simplify an interior installation because no loose trailer power cable is required. Charge it before the trip and confirm the expected runtime. Fixed cameras can use a compatible trailer power source when installed according to the camera and trailer electrical requirements, with all wiring protected from horses and moving equipment.
Can a horse trailer camera replace stopping to check the horse?
No. A camera lets you observe the trailer between stops, but it cannot confirm the horse's medical condition or physically inspect the floor, dividers, doors, ventilation, tack, or trailer hardware. Continue normal stopping and direct-check routines appropriate for the trip.
Final Thoughts: Build the Camera Setup Around Two Different Views
A horse trailer camera system becomes much easier to choose once rear visibility and interior observation are treated as separate jobs.
If you need one camera, decide which problem matters most.
If you regularly haul horses and want both towing visibility and an interior view, a dual-camera setup can place one camera behind the trailer and one securely inside the horse compartment.
Then evaluate the installation around four practical details:
- Can each camera see the area it is responsible for?
- Does the wireless signal remain stable through the closed metal trailer?
- Will each camera stay powered for the full trip?
- Is every camera, mount, and cable safely outside horse contact areas?
Test all four before loading.
A backup camera for truck and trailer combination can add useful visual context while towing, and an interior camera can show what is happening inside the horse compartment. Mirrors, direct trailer inspections, secure towing equipment, and regular horse checks remain part of every trip.
For most dual-purpose setups, start with one rear exterior view and one carefully positioned interior view, then test the complete wireless connection with the truck and trailer exactly as they will be used on the road.


