


The first storm in an RV can sound much bigger than it looked on the forecast.
Rain hits the roof with a steady drumbeat. Wind starts moving the branches outside. The awning fabric makes a sound you suddenly notice for the first time. Every few minutes, you find yourself looking toward the windows to see whether water is getting in.
Then the phone lights up with another weather alert.
For a first-time RV traveler, that combination can make a normal evening feel surprisingly tense.
The best response is having a simple routine ready before the rain gets loud.
That routine starts well before the storm reaches the campsite. Check the forecast again. Know where the sturdy shelter is. Look at the campsite differently when wind and heavy rain are possible. Put loose outdoor gear away early. Keep the things you may need during the night in one place.
Once the rain starts, the focus shifts indoors. Watch the windows, roof openings and slide-out edges for moisture. Listen for changes. Keep official alerts available. If conditions become dangerous, the shelter or evacuation plan takes priority.
After the weather passes, wait for safe conditions and inspect the RV before the next driving day.
This checklist is designed to make that first storm feel more organized—from the forecast through the final post-storm walk-around.
Quick Navigation
- Quick Storm Checklist
- Is It Time to Stay or Seek Shelter?
- 1. Keep Checking the Weather
- 2. Find the Shelter Early
- 3. Read the Campsite Differently
- 4. Park Before Visibility Gets Worse
- Rear Visibility in Rain
- 5. Add a Useful Second View
- 6. Bring Outside Gear In
- 7. Check for Leaks Inside
- 8. Keep Essentials Ready
- 9. Know When to Leave the RV
- 10. Wait Before Inspecting
- 11. Complete a Post-Storm Check
- Full Storm Checklist
- Frequently Asked Questions
Severe-weather priority: An RV should not be treated as a safe shelter from a tornado, dangerous wind event or rising floodwater. Follow official alerts, campground instructions and local emergency guidance. When a warning or evacuation instruction calls for shelter or relocation, move to the identified sturdy shelter or safer location as early as conditions allow.
Quick Answer: What Should You Do When a Storm Is Approaching an RV Campsite?
Start with the weather information, then work outward from the RV.
| Storm Stage | Main Action |
|---|---|
| Before travel | Review the forecast, official alerts and possible storm timing |
| Before arrival | Decide whether delaying, rerouting or changing campsites makes more sense |
| At the campsite | Check trees, drainage, low ground and the route to shelter |
| Parking | Finish positioning while visibility is still manageable when practical |
| Before the storm | Retract the awning and secure loose outdoor equipment |
| Inside the RV | Check windows, roof openings, slide edges and seals for moisture |
| Emergency readiness | Keep shoes, keys, phone, lights and essential medication easy to reach |
| Severe warning | Follow official shelter or evacuation instructions immediately |
| After the storm | Wait for safe conditions before inspecting the exterior |
| Final inspection | Check seals, tyres, exterior gear, mounts and camera lenses |
The most important decision is knowing when campsite preparation stops being the priority and the shelter plan takes over.
First Question: Is This Weather You Can Manage at Camp, or Weather You Need to Leave?
Rain by itself does not automatically turn an RV trip into an emergency.
A wet evening may simply mean bringing the chairs inside, retracting the awning, checking the seals and staying aware of the forecast.
Severe-weather warnings change the situation.
Conditions that deserve immediate attention include:
- a tornado warning
- a flash flood warning affecting the campground or access roads
- dangerous winds
- rapidly rising water
- an evacuation order
- instructions from campground staff or emergency officials to seek shelter
At that point, protecting chairs, checking a leak or adjusting a camera can wait.
Your shelter or evacuation plan becomes the next action.
This distinction is worth deciding before dark. It is much easier to make a good decision when you already know where the shelter is, how to reach it and which road leads away from a flood-prone area.
Step 1: Keep Checking the Forecast as the Trip Develops
Checking the weather once before leaving home is a good start.
RV trips cover enough distance that the conditions at breakfast may be very different from what is happening near the campground six hours later.
Check again:
- before departure
- during a fuel or rest stop
- before committing to the final route
- when arriving at the campground
- before going to sleep when storms are possible overnight

Pay Attention to More Than Rain Percentage
The chance of rain tells only part of the story.
Also look for:
- severe thunderstorm watches or warnings
- tornado watches or warnings
- flash flood watches or warnings
- high-wind alerts
- campground messages
- local emergency information
A watch is a good signal to improve readiness and keep checking conditions. A warning calls for the action described in that alert.
For an RV traveler, that may mean changing arrival time, choosing a different route, moving away from low ground or heading to the pre-identified shelter.
What to remember: Treat the forecast as something that changes during the trip and keep official alerts available until the weather has passed.
Step 2: Find the Sturdy Shelter Before You Need It
One of the most useful questions to ask at check-in is also one of the easiest to forget:
“Where should we go if a severe-weather warning is issued?”
The answer may be:
- a designated storm shelter
- a substantial campground building
- another approved nearby structure
- a location identified by local emergency management
Ask campground staff for the actual shelter plan.
A building near the entrance should not automatically be assumed to be the designated safe location.
Know the Route Too
Knowing the shelter name is only half the plan.
Also confirm:
- how far away it is
- whether you can walk there quickly
- which road or path reaches it
- whether gates or access points close at night
- how pets are handled if you travel with them
- where to go if evacuation is ordered
Save the location in your phone and make sure everyone traveling with you knows the plan.
That preparation is especially useful at night, when heavy rain, wind and darkness can make even a familiar campground feel different.
Step 3: Read the Campsite Differently When Storms Are Possible
A beautiful campsite on a calm afternoon can look very different once heavy rain and wind enter the forecast.
Take a few minutes to inspect the surroundings before settling in.
Look Up at the Trees
Notice obvious concerns around the parking area:
- dead-looking limbs
- large damaged branches
- trees leaning over the campsite
- heavy branches directly above the RV
You do not need to diagnose the health of a tree yourself.
If the site has an obvious overhead concern, ask campground staff whether another site is available.
Look Down at the Drainage
Rain has to go somewhere.
Check for:
- low spots
- drainage channels
- muddy areas
- water already collecting near the site
- nearby creeks, rivers or washes
- access roads that pass through visibly low terrain
A campsite close to water may be attractive in good weather. Rising-water or flash-flood risk changes the priority quickly.
Think About the Way Out
Before fully setting up, identify:
- the campground exit
- an alternate exit if one exists
- the route to higher ground
- the route to the designated shelter
This gives you useful options before rain reduces visibility or water begins covering low sections of road.
What to remember: When storms are possible, evaluate the campsite for overhead hazards, drainage and access to shelter as carefully as you evaluate the view.
Step 4: Finish Parking Before Visibility Gets Worse
If the timing works, get the RV into its final campsite position before the heaviest rain arrives.
Rain can make a familiar backing maneuver feel different.
Mirrors collect water. Windows become harder to see through. A dark campground road loses contrast. Rocks, posts and campsite edges can be harder to distinguish.
The answer is more time and less pressure.
During a rainy campsite approach:
- slow down early
- use the mirrors carefully
- keep the spotter visible
- pull forward when the angle becomes awkward
- stop when any part of the view becomes uncertain
- get out and recheck the campsite when conditions allow safely
There is no prize for completing a rainy backing maneuver in one attempt.
A short reset can be much easier than trying to correct a poor angle while water is running across the mirrors.

A Weather-Resistant Rear View for Rainy Campsite Parking
A rear camera still has to live outside when the weather turns wet.
The Solar3A Plus Max uses a camera with an IP69K waterproof rating and provides a 1080P Full HD image through its dedicated 7.2-inch display.
That makes the camera hardware suited to wet outdoor use and gives the driver another rear view while approaching a campsite in ordinary rainy conditions.
Weather resistance does not keep every raindrop, splash or patch of road grime off the lens.
Water on the camera surface can reduce contrast or blur small details even while the camera itself continues operating.
When conditions allow safely, check the lens and wipe away water or dirt that is affecting the image.
The same principle applies after driving through muddy roads or spray from highway traffic.
Keep the Battery in the Normal Pre-Trip Routine
Solar3A Plus Max uses a rechargeable battery with solar-assist charging.
Solar charging is supplemental. Cloud cover, shade, mounting angle, season and camera use can affect the amount of energy the solar panel adds.
Check the battery before the trip rather than assuming a stormy day will provide enough solar input to recover a low charge.
The camera adds rear visual information during the parking process. It does not make the RV suitable for remaining in dangerous severe weather.
Step 5: Add a Second View When One Corner Is Harder to Judge
Rain does not always affect every view equally.
The main rear path may still be easy to see while the passenger-side rear corner disappears into a dark tree line. A pedestal may sit close to one side of the site. A hitch or cargo carrier may create another rear reference point worth watching.
The Solar5B Dual-Camera Kit can provide one main rear view plus a second movable camera angle.
Depending on the vehicle and mounting position, the second camera can be aimed toward:
- the passenger-side rear corner
- the campsite edge
- a utility pedestal
- a hitch or rear accessory
- another selected side-rear area
A single-camera Solar5B can serve a more straightforward rear-view need.
For drivers using Solar5B AI, Smart Reversing Assist can add another cue during low-speed backing by detecting people and vehicles within the parking guideline area. Steering, braking and parking remain under driver control, and campsite objects such as rocks, branches and posts still require normal observation.
Larger RVs May Need More Rear and Side Context
A large motorhome, fifth wheel or long trailer may have several important areas around the vehicle during a wet campground approach.
The CampSync D1 uses three cameras and four lenses: one dual-lens rear camera plus left and right side cameras.
The two rear perspectives can provide farther and closer rear context while the side cameras add selected left- and right-side views.
The WF4 multi-camera configuration uses one rear camera plus two side cameras for rear, left and right context.
These multi-view layouts can be useful for larger rigs during campground turns and slow backing maneuvers.
Wireless refers to video-signal transmission. The cameras and display still need their supported power connections.
What to remember: Use each camera for a specific area, then slow down or stop whenever rain makes that area difficult to interpret.
Step 6: Bring the Campsite Back Into Travel Mode
The campsite often expands quickly after arrival.
Chairs come out. A mat goes down. Bikes get unloaded. A small table appears beside the door. The awning turns the passenger side of the RV into an outdoor room.
When strong wind or thunderstorms are approaching, simplify the campsite again.
Retract the Awning Early
An awning has a large surface area exposed to wind.
Follow the awning manufacturer's instructions and retract it before conditions deteriorate.
Waiting until the rain and wind are already strong can turn a simple task into a much harder one.
Bring Loose Items In
Depending on your campsite, that may include:
- camp chairs
- folding tables
- outdoor mats
- lightweight cooking equipment once safely cool
- tools
- toys
- decorations
- trash containers
- pet equipment

Check Bikes and Exterior Gear
If bikes remain on a rack, check the rack, attachment points and loose accessories.
Also inspect:
- cargo carriers
- spare-tire mounts
- portable steps
- exterior hoses
- storage doors
- outdoor kitchens
Close and latch exterior compartments before wind and heavy rain arrive.
This is a good time to bring keys, shoes and rain gear inside as well. Once the weather gets worse, fewer trips outside are better.
Step 7: Check the RV From the Inside While the Rain Is Falling
Steady rain can reveal a seal problem that stayed invisible during dry-weather travel.
You may first notice a darkened trim edge, a small bead of water or a damp spot near a window.
Start by locating and containing the water.
Check the Windows
Look around:
- lower corners
- window frame
- interior trim
- visible seals
Check Roof Openings From Inside
Pay attention around:
- roof vents
- skylights
- ceiling openings around roof-mounted equipment
- areas where previous water stains have appeared
Check the Slide-Out Edges
Inspect:
- upper corners
- side seals
- lower interior edge
- floor around the slide
Check Doors and Storage Areas
Look around the entry door and any interior surface next to an exterior storage compartment.
If you find moisture:
- Move belongings away from the wet area.
- Catch or absorb the water where practical.
- Photograph the location.
- Note where the leak appears in relation to the outside of the RV.
- Monitor whether the leak grows or changes as wind direction changes.
That information can make the exterior inspection and later repair much easier.
Roof safety: Do not climb onto a wet RV roof during an active storm to investigate a leak. Protect the interior first and wait for safe, dry enough conditions to inspect the exterior according to the RV manufacturer's access guidance.
Step 8: Keep the Things You May Need in One Place
A severe-weather alert at 2:00 a.m. feels very different from one that arrives during dinner.
Keep a small group of essentials together before going to sleep when storms are possible.
A practical setup includes:
- charged phone
- official weather alerts enabled
- flashlight or headlamp
- backup light
- shoes
- keys
- identification
- rain jacket
- essential medication
- pet leash or carrier where applicable
You do not need to turn the RV into a disaster-supply warehouse for one rainy night.
The goal is simply to avoid searching through cabinets for shoes, keys or a flashlight when an alert says it is time to move.
Use the Same Place Every Time
A simple overnight routine works well:
Shoes + Keys + Phone + Light
Keep them together and make sure everyone knows where they are.
That small habit can save valuable time if the shelter plan suddenly becomes active.

Step 9: Know When the Checklist Stops and the Shelter Plan Takes Over
Everything in this article—from awning checks to leak checks—depends on conditions being appropriate for remaining at the campsite.
When official guidance calls for shelter or evacuation, move to the safety plan.
During a Tornado Warning
Do not rely on the RV as tornado shelter.
Move to the designated storm shelter or another substantial structure identified by campground staff or local emergency guidance.
Make that move early enough to avoid waiting until the strongest conditions reach the campsite.
During Flash-Flood or Rising-Water Threats
Low-lying campgrounds and access roads deserve immediate attention when water begins rising.
Follow evacuation orders and move toward higher ground when directed.
Never drive around a flood barricade or attempt to judge the depth of water covering a roadway from the driver's seat.
Floodwater can hide road damage, debris and washed-out pavement.
During Dangerous Wind
Follow official warnings and campground instructions.
If the local guidance calls for a sturdy shelter, use the location identified in the storm plan.
Camera systems, leveling equipment and stabilizers do not turn an RV into a severe-weather shelter.
What to remember: Storm preparation helps you manage the campsite. Official warnings determine when the priority shifts to shelter or evacuation.
Step 10: Wait Until Conditions Are Safe Before Inspecting the RV
Silence after a storm can make it tempting to step outside immediately.
Give the situation another check first.
There may still be:
- lightning nearby
- another storm cell approaching
- branches that have become unstable
- water continuing to rise
- flooded sections of campground road
- downed electrical equipment
Check official alerts and campground information before starting the exterior inspection.
If you evacuated to a shelter, wait for the appropriate all-clear or instructions before returning to the campsite.
The RV can wait a little longer.
Step 11: Check the RV After the Weather Clears
Once conditions are safe, walk around the complete RV before packing up or driving away.
Start With the Ground
Look for:
- standing water
- new mud or erosion
- washed-out ground near the tyres
- changes around leveling blocks
- debris beneath the RV
If the ground around a tire, jack or leveling point has changed significantly, assess the situation before moving or adjusting the rig.
Look at the Roof and Upper Areas From the Ground
Check for visible damage involving:
- branches
- awning hardware
- vent covers
- roof accessories
- antennas
A closer roof inspection can wait until the roof is dry enough for safe access and the manufacturer's guidance allows it. Professional inspection is the better choice when access is uncertain or damage appears significant.
Recheck the Seals
Inspect accessible areas around:
- windows
- doors
- slide-outs
- exterior compartments
- visible roof seams from a safe position
Match any exterior findings with the leak locations photographed inside.
Check Tyres and Exterior Equipment
Look at:
- tyres
- bike rack
- cargo carrier
- spare-tire mount
- storage doors
- steps
- awning hardware
Clean and Recheck the Cameras
Rain, road spray and windblown dirt can leave the lens wet or dirty.
Check:
- camera mount
- viewing angle
- lens surface
- live image
- power condition
An IP-rated camera can withstand the wet environment specified for the product, while a dirty lens can still make the image harder to interpret.
What to remember: After the storm, check the ground first, then work your way around the RV before the next drive.
First-Night RV Storm Checklist
| Stage | What to Check |
|---|---|
| Before travel | Forecast, storm timing and official alerts |
| Route | Weather along the drive, flood-prone roads and alternate route |
| Campsite | Trees, drainage, low ground and access roads |
| Shelter | Identify the designated sturdy shelter before weather deteriorates |
| Parking | Finish positioning early where practical and slow down in rain |
| Rear visibility | Check camera lens, mirrors and selected rear or side views |
| Exterior | Retract awning and secure chairs, bikes and loose gear |
| Interior | Check windows, roof openings, doors and slide seals |
| Night readiness | Keep shoes, keys, phone, light and medication easy to reach |
| Severe warning | Follow official shelter or evacuation instructions |
| During rain | Monitor leaks from inside and avoid unsafe roof access |
| After weather | Confirm conditions are safe before going outside |
| Post-storm | Inspect ground, seals, tyres, exterior gear and cameras |
AUTO-VOX Viewing Options for Wet Campsite Approaches
| Product | Useful Viewing Need | Role in This Setup |
|---|---|---|
| Solar3A Plus Max | Main rear view | 1080P Full HD camera with IP69K waterproof rating |
| Solar5B Dual-Camera Kit | Main rear + selected second angle | Flexible rear and side-rear campsite views |
| CampSync D1 | Farther/closer rear + left/right context | Multi-view option for larger RVs and longer rigs |
| WF4 | Rear + left/right context | Three-camera option for compatible larger RVs and trailers |
Camera Options for Wet-Weather RV Positioning

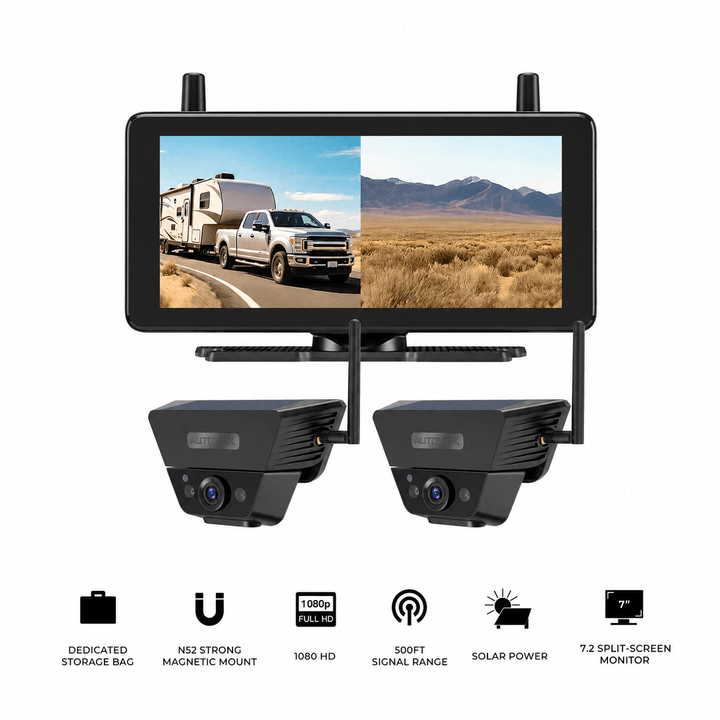


Prices and configurations may change. Confirm the current product page, selected package, RV compatibility, mounting method and power requirements before purchase.
Common First-Night RV Storm Mistakes
Checking the Weather Only Before Departure
Conditions can change across a long driving day. Check again along the route, near arrival and before going to sleep when storms are possible.
Choosing the Campsite Without Looking at Trees or Drainage
A shaded site or waterside location can have different tradeoffs during heavy rain and wind. Check overhead branches, low areas and the route to higher ground or shelter.
Waiting Until the Heavy Rain Arrives to Finish Parking
When practical, get into the final position before visibility deteriorates. If you are already parking in rain, slow down and use pull-forward resets or direct checks whenever the view becomes unclear.
Leaving the Awning Out Too Long
Retract the awning early when strong wind or storms are approaching and follow the awning manufacturer's instructions.
Assuming a Waterproof Camera Always Has a Clear Lens
Waterproofing protects the camera hardware within its rating. Rain droplets, mud and road spray can still reduce image clarity.
Climbing Onto the Roof During the Storm
Handle a leak from inside first. Wait for safe conditions before inspecting a wet roof.
Using the RV as the Severe-Weather Shelter
Follow official tornado, dangerous-wind, flood and evacuation guidance. Know the sturdy shelter and exit route before severe weather arrives.
Frequently Asked Questions
Is an RV safe during a tornado?
An RV should not be used as tornado shelter. When a tornado warning affects your location, follow official guidance and move to the designated storm shelter or another substantial structure as quickly as conditions safely allow. Identify that location before severe weather reaches the campground.
What should I bring inside before strong winds arrive?
Start with the awning and lightweight outdoor items such as chairs, tables, mats, tools, decorations and loose camping gear. Secure bikes, racks, cargo equipment and exterior compartments according to the equipment manufacturer's instructions.
What should I do if my RV starts leaking during a storm?
Work from inside first. Move belongings away from the leak, contain the water, photograph the wet area and note where it appears in relation to the exterior. Once the storm passes and conditions are safe, inspect the corresponding seals and exterior area or arrange professional service.
Can I climb onto the RV roof to stop a leak while it is raining?
A wet RV roof during an active storm adds fall and weather-related risks. Protect the interior and wait for suitable conditions before accessing the roof. Follow the RV manufacturer's safe-access guidance and use professional service when appropriate.
Is Solar3A Plus Max waterproof?
The Solar3A Plus Max camera carries an IP69K waterproof rating and provides a 1080P Full HD image. Water, mud or road spray on the lens can still reduce visibility, so inspect and clean the camera surface when conditions allow safely.
Can a backup camera help with rainy RV parking?
A backup camera can provide additional rear or side visual context during a slow campsite maneuver. Rain can still reduce image quality through droplets, spray or low contrast. Use the camera together with mirrors, direct checks, appropriate speed and a spotter where useful.
Final Thoughts: Prepare Before the Rain Gets Loud
Your first night in an RV storm can feel intense because every sound is new.
The rain on the roof sounds louder. The wind makes the campsite feel less familiar. A small wet spot near a window suddenly gets your full attention.
A simple storm routine turns those unknowns into actions you already understand.
- Check the forecast and official alerts throughout the trip.
- Identify the sturdy shelter and evacuation route at the campground.
- Look at trees, drainage and low ground before settling in.
- Finish parking before visibility deteriorates where practical.
- Use rear and side views carefully during rainy maneuvers.
- Retract the awning and secure loose outdoor equipment early.
- Check windows, roof openings and slide edges from inside during the rain.
- Keep shoes, keys, phone and a light together overnight.
- Follow official shelter or evacuation instructions when severe weather threatens.
- Wait for safe conditions before going outside after the storm.
- Inspect the RV, exterior equipment and cameras before the next drive.
You cannot control what the weather does during an RV trip.
You can control how early you check it, how quickly you simplify the campsite and how prepared you are to move to shelter when conditions require it.
Save this RV storm checklist to your phone before the next trip, and confirm the campground's sturdy shelter and evacuation route before the weather turns bad.


