


Is installation of AUTO-VOX backup cameras complicated?
Up To 38% OFF
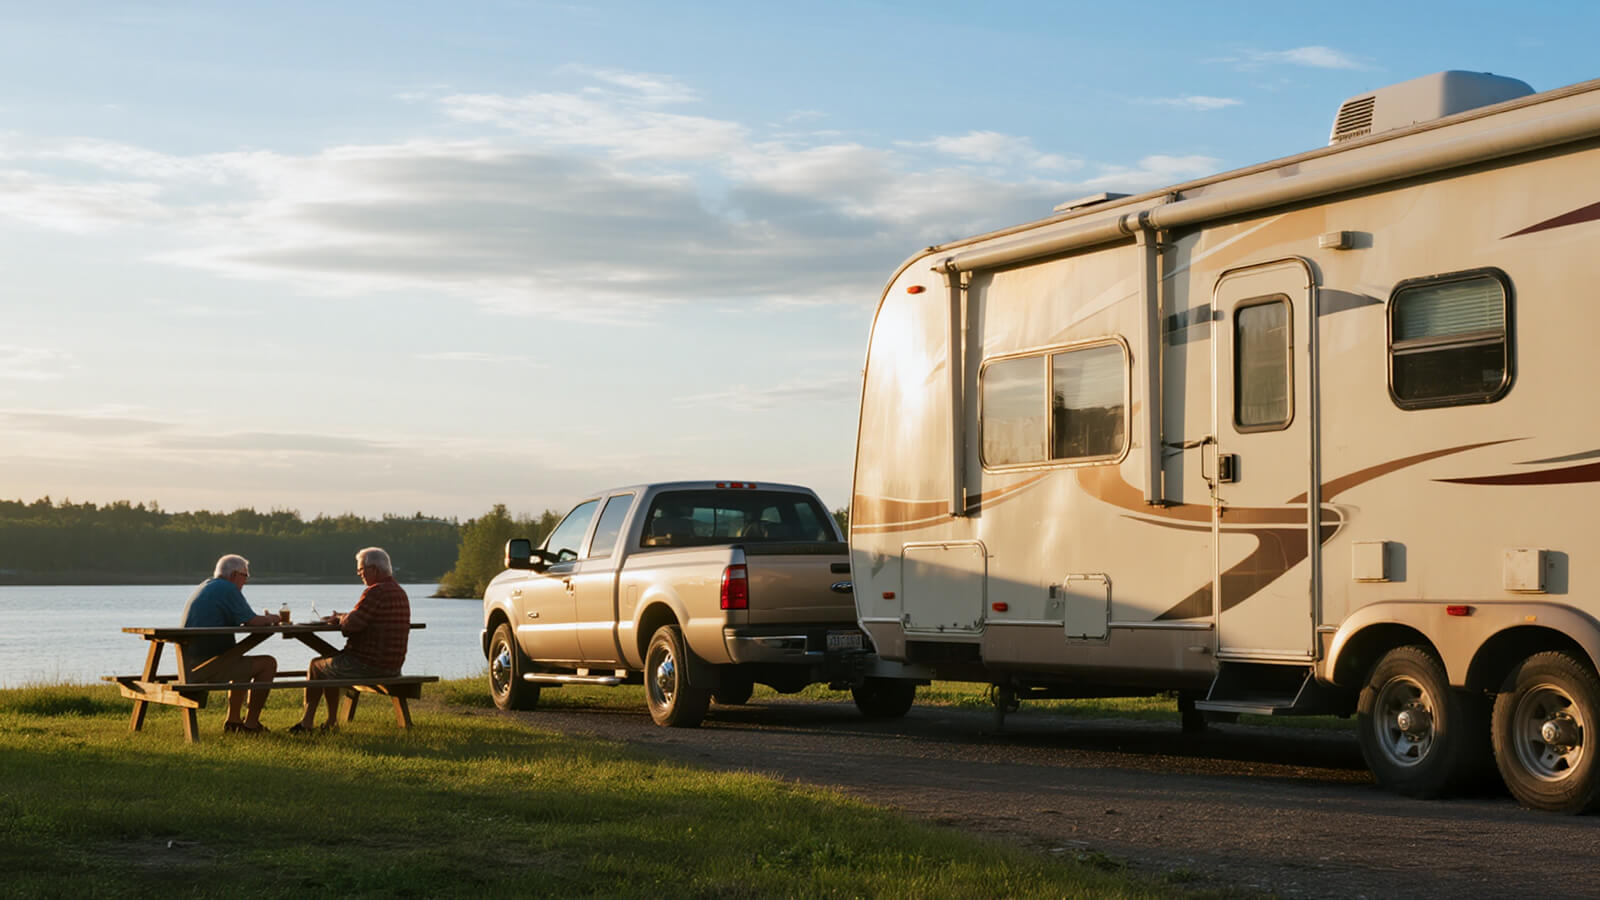
RV Season Launch:
Unleash Your Summer Adventure.
RV Season Launch:
Unleash Your Summer Adventure.
Summer sale starts now!


Drive Smarter Every Day — Safer Parking, Clearer Vision.
Drive Smarter Every Day — Safer Parking, Clearer Vision.
Perfect for city driving, trailers, and family vehicles.

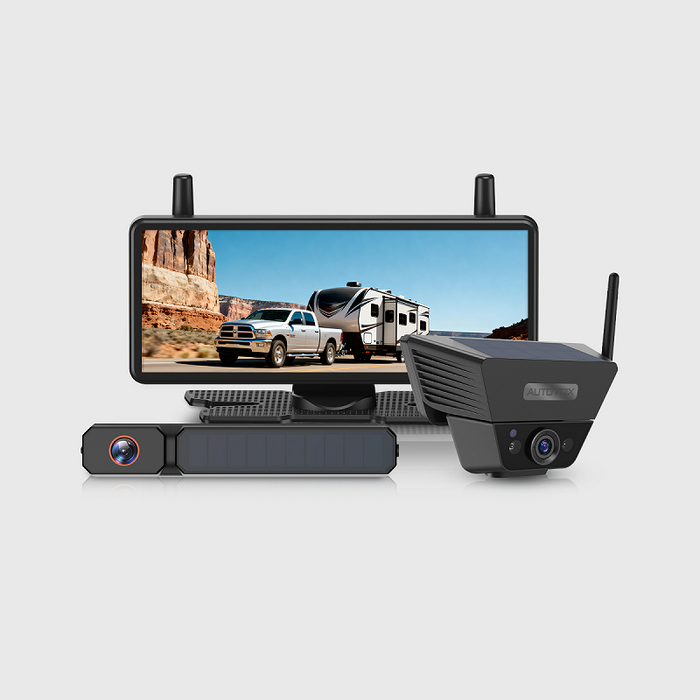
AUTO-VOX Solar5 Series
One Fixed, One Flexible
From Daily Commute to Weekend Haul—Snap, Sync, and Go on Any Vehicle.

New AUTO-VOX WF Series
Three Cameras.
One Safer RV Journey.
Modular, Expandable, Made for RVs.

ABOUT
AUTO-VOX
Trusted by 500,000+ Drivers Worldwide.
The smarter way to see what’s behind.

Worldwide Shipping
Available in more than 20 countries.
SUPPORT 24/7
24/7 Support, anytime you need it.
100% PAYMENT SECURE
Shopify official payment, 100% secure payment guaranteed.
30-Day Return Policy
Support 30-day no-reason return and exchange.
Quick Finder

With DVR
For Cars & SUVs
For RV
For Trailers
Multi-camera
Rearview Mirror
Top Picks for Every Driver
Shop by Category
Camping & RVing
Explore freely. Park anywhere.

Towing & Trailers
Hook up. Back up right.

Daily Commute
Park easy. Stay safe.

Power & Connection
Solar Series
Dual power supply — solar + USB, no wiring needed. Install in 1 minute, enjoy stable 500+ ft signal across all vehicle types. Smart, effortless, and eco-friendly.


Wireless Series
Strong signal, zero hassle. Powered by AutoLink™ 2.4GHz transmission for stable, long-distance performance. Just connect the camera to the reversing light, plug in the monitor — and drive with confidence.

Wired Series
Classic connection, ultimate reliability. Hardwired setup ensures real-time, interference-free video at all times. Built for family vehicles that value consistency and durability.

Drive with Confidence & Ease
Founded in 2007, AUTO-VOX specializes in auto safety electronics.
We offer a complete range of products —wired, wireless, and solar-powered-focused on making driving safer and easier.
What Our Customer Say
Steven Tucker
⭐️⭐️⭐️⭐️⭐️

“We got few wireless back up camaras from Auto-Vox. It's easy to install and have good signal. I've used it for travel trailer so it's about 30' from the camara to monitor and still works really good. Very happy with the products. Reliable company.”
Solar4 A 1080P Wireless Backup Camera
Jerry
⭐️⭐️⭐️⭐️⭐️

I don't usually write reviews, but I must in this case! ! had some trouble at first. These folks walked me through and even sent replacement equipment. Awesome!! Very good quality...clear, easy to instaall..
Solar3A Plus 1080P Wireless Backup Camera
Adan
⭐️⭐️⭐️⭐️⭐️

Unfortunately we had some trouble with our reversing camera. We contacted Auto-Vox and corresponded with Kaya. Excellent customer service which is seldom nowadays. Always quick to respond and very professional.
Solar3A Plus 1080P Wireless Backup Camera
sgallery
⭐️⭐️⭐️⭐️⭐️

I purchased a back up camera from my Rv last year September 2023 and was so impressed I opted to purchase another one to use as a trail camera on the front of my jeep while offroading for this year while we are in Arizona, important to see what you are about to go over before you actually climb onto it.
V5 Pro 1080P Rear View Mirror Dash Cam
John
⭐️⭐️⭐️⭐️⭐️

Mounted to the bottom of the license plate. Trunk handle is on top. Very clear image and strong connection. Installation instruction were clear and concise. I would recommend.
Solar4 A 1080P Wireless Backup Camera
Sandra
⭐️⭐️⭐️⭐️⭐️

I ordered a solar 1 back up camera very easy to fit and use hardest thing was to get the number plate off the car very good product at a good price delivery was 4
day
V5 Pro 1080P Rear View Mirror Dash Cam
BlogS

By AaliyahGloria
Guides
May 18, 2026
Picking up a rental RV is exciting, but it is also the moment when many first-time travelers make avoidable mistakes.
Once you leave the lot, small problems become your problems. A missing sewer hose adapter, a weak tire, a dead house battery, or a backup camera that does not work properly can turn a fun road trip into a stressful first day.
That is why the smartest thing you can do before driving away is a simple, practical walk-through. Not just a quick glance at the outside, but a real check of the things that matter most once you are on the road.
This guide covers the five things every first-time renter should check before leaving the lot, with extra attention to one item many people overlook until it is too late: the camera system.
Quick RV Rental Departure Checklist
| What to Check | Why It Matters |
|---|---|
| Exterior condition and paperwork | Helps avoid disputes over pre-existing damage |
| Tires, mirrors, lights, and basic driving setup | Improves safety before you even leave the lot |
| Water, power, propane, and tank basics | Prevents campsite setup confusion later |
| Doors, storage bays, steps, and interior essentials | Stops small oversights from becoming travel delays |
| Backup camera and rear visibility | Makes reversing, parking, and lane awareness much easier |
Why Rental RVs Need a Different Pre-Trip Check
If you own an RV, you gradually learn its quirks. You know which cabinet sticks, how long the batteries usually last, and whether the rear camera takes a few seconds to connect.
A rental RV is different. You are stepping into an unfamiliar vehicle, often much larger than what you drive every day, and you are expected to figure it out fast.
That is why first-time renters should not rely on “it should be fine.” The goal is to catch anything confusing, missing, or not working before you are already in traffic or pulling into your first campsite.
1. Check the Exterior and Document Any Damage
Before anything else, walk around the entire RV slowly and look for visible issues.
Pay close attention to:
- scratches, dents, or cracked trim
- bumper damage
- mirror condition
- window and windshield cracks
- roof edge or awning damage if visible
- signs of previous impact near the rear or side corners
Take photos or video before you leave. Do not assume the rental record already shows every cosmetic issue.
This matters for two reasons:
- it protects you if there is a return dispute
- it helps you notice damage in places that may affect driving or visibility
If the RV has visible rear-end damage, pay extra attention to the camera system, bumper area, and any attached lighting near the back.
2. Check Tires, Mirrors, Lights, and Basic Driving Visibility
Before your first trip, the RV should feel safe to drive, not just technically ready to rent.
Check:
- tire condition and visible tread
- tire pressure if possible
- headlights and brake lights
- turn signals
- side mirrors and rear visibility
- windshield wipers
Then sit in the driver’s seat and adjust everything before you move:
- seat position
- steering wheel position if adjustable
- left and right mirrors
- screen brightness and dashboard visibility
Many first-time renters underestimate how different a motorhome feels from a normal car or SUV. Good mirror setup is not optional. It is one of the basics that will make the whole drive feel more controlled.
3. Learn the Hookups and Utility Basics Before You Need Them
Even if you are only renting for a weekend, you should understand the basic utility setup before leaving the lot.
At minimum, ask the rental team to show you:
- shore power connection
- fresh water hookup
- gray and black tank basics
- propane status
- generator use if included
- battery or control panel indicators
You do not need a masterclass. You just need enough confidence to avoid standing at a campsite at sunset wondering which hose goes where.
It is also smart to confirm that all included items are actually there:
- power cord
- water hose
- sewer hose
- any needed adapters
- leveling blocks if promised
These details may seem unrelated to driving away, but first-day campsite problems often start with things that should have been checked before departure.

4. Check Doors, Steps, Storage Bays, and the Everyday Basics
Small mechanical annoyances can become major frustrations on the road, especially for first-time renters.
Before leaving, test the basics you will use repeatedly:
- main entry door lock
- storage compartment latches
- steps
- fridge function
- interior lights
- air conditioning or fan controls
- bed conversion or slide operation if relevant
You do not need to test every feature in depth, but you should make sure the RV feels usable, not mysterious.
This is also the time to ask practical questions, such as:
- How do I turn on the water pump?
- How do I check tank levels?
- Where is the fuse panel?
- How do I close everything securely before driving?
The less guessing you do later, the smoother your rental experience will be.
5. Do Not Forget the Backup Camera
This is one of the most overlooked checks before leaving the rental lot.
Many first-time RV renters assume the backup camera is just another feature that will obviously work. But the camera system is too important to leave unchecked, especially when you are driving a longer vehicle in unfamiliar conditions.
Before you drive away, make sure you know:
- whether the RV has a working rear camera
- where the monitor image appears
- whether the picture is clear enough to use
- whether it switches on automatically in reverse
- whether it can also help with rear visibility while driving
If the image is blurry, delayed, too dim, or unreliable, ask about it before you leave. A camera that only “sort of works” is not something you want to discover while backing into a campsite or maneuvering in a crowded fuel station.
For first-time renters, a good camera system helps with:
- backing into campsites
- parking in tighter spaces
- checking clearance behind the RV
- feeling more confident on the first day of driving
This is also why rear visibility matters so much when comparing long-term RV upgrades. If you later decide to buy your own rig, a dependable backup camera for RV can be one of the most worthwhile additions for everyday safety and easier maneuvering.
What to Ask the Rental Company Before You Leave
If you are new to RV travel, do not be afraid to ask simple questions. It is better to take ten extra minutes in the lot than lose an hour figuring something out on your own later.
Good questions include:
- What is the RV height and length?
- What fuel type does it use?
- Does the backup camera work only in reverse, or also while driving?
- Are there any quirks I should know before my first stop?
- What should I do if a warning light comes on?
- Is roadside assistance included?
For camera-related confidence, you can also ask the staff to show you the rear view on the screen before departure. That quick demo can save a lot of uncertainty later.
Common First-Time Rental Mistakes
Rushing the Walk-Through
Excitement makes people hurry. That is when details get missed.
Assuming the Camera Works Fine Without Checking
Rear visibility is too important to leave to chance.
Not Photographing Existing Damage
A few minutes of documentation can save a lot of stress at return time.
Leaving Without Understanding the Basics
You do not need to know everything, but you should know enough to power up, hook up, lock up, and back up with confidence.
How to Make Your First RV Rental Feel Easier
The best first rental experiences usually come down to one thing: reducing uncertainty.
Before you pull out of the lot, try to leave with confidence in these areas:
- the RV is documented and in acceptable condition
- the lights, mirrors, and tires look right
- the water, power, and tank basics make sense
- doors and compartments close securely
- the backup camera works the way you expect
That final point matters more than many new renters realize. A reliable wireless backup camera or rear-view setup does not just make parking easier. It can make your entire first day feel calmer and more manageable.
Final Thoughts
If this is your first RV rental, do not judge readiness by whether the keys are in your hand.
Judge it by whether you have checked the things that matter once you are actually driving and setting up on your own.
Before you leave the lot, make sure you understand:
- the vehicle’s condition
- its driving visibility
- the utility basics
- the daily-use essentials
- the camera system
That last one is easy to overlook, but it can have a huge impact on confidence, safety, and stress during your trip. If you later want to compare better rear-view options for future RV travel, AUTO-VOX also offers a range of backup camera solutions designed for easier visibility on the road.
FAQs
What should I check before driving a rental RV?
Check the exterior condition, tires, mirrors, lights, hookups, doors, storage compartments, and the backup camera before leaving the lot.
Do rental RVs usually come with a backup camera?
Some do, but not all systems work equally well. Always test the camera and monitor before driving away.
Why is the backup camera so important on a rental RV?
Because you are driving an unfamiliar, larger vehicle. A working camera makes reversing, parking, and rear visibility much easier, especially for first-time renters.
Should I take photos of a rental RV before leaving?
Yes. Photos or video can help document pre-existing damage and protect you if there is any disagreement when you return the vehicle.
What is the most common first-time RV rental mistake?
Rushing the departure process. Many new renters leave without fully checking the basics, especially the camera, hookups, and condition documentation.

By AaliyahGloria
Guides
May 18, 2026
For many drivers, an aftermarket backup camera is one of the most useful upgrades they can add to an RV, trailer, truck, or daily vehicle. It makes reversing easier, improves rear visibility, and adds confidence in places where mirrors alone are not enough.
But there is one concern that comes up more often than many brands expect: theft.
In some areas, especially where vehicles are parked outdoors, on public streets, or at campsites for longer periods, owners worry that an exposed camera could become an easy target. That concern is understandable. A visible camera mounted on the rear of a vehicle can look like a quick item to grab if it is not secured well.
The good news is that camera theft is not something you have to accept as unavoidable. With the right mounting approach, better hardware, and a few smart habits, you can make an aftermarket camera much harder to remove and far less attractive to steal.
This guide explains the most practical ways to protect an aftermarket backup camera from theft, especially for RVs, trailers, and other vehicles where the camera is easier to spot from behind.
Quick Checklist: How to Make a Backup Camera Harder to Steal
| Anti-Theft Measure | Why It Helps |
|---|---|
| Use a more secure mounting base | Makes the camera harder to remove quickly |
| Add a locking clip, lock buckle, or tamper-resistant hardware | Prevents easy hand removal or casual theft |
| Choose less exposed mounting positions when possible | Reduces visibility and easy reach from behind |
| Check the camera before and after stops | Helps you catch looseness or tampering early |
| Park smarter in public or overnight settings | Lowers the chance of opportunistic theft |
Why Aftermarket Backup Cameras Can Feel Vulnerable
Unlike a fully built-in factory camera, an aftermarket unit is often easier to see. That visibility is part of what makes some owners uneasy.
The concern is usually higher when the camera is mounted on:
- the rear of an RV
- a trailer or horse trailer
- a pickup truck
- a camper used for overnight travel
- a vehicle parked outside for long periods
Owners may worry that someone could:
- pull the camera off by hand
- tamper with the mount
- steal the unit during a stop or overnight stay
- damage the camera while trying to remove it
That does not mean aftermarket systems are a bad choice. It simply means security should be part of the buying and installation decision, not something people think about only after they feel exposed.

1. Start With a More Secure Mounting Base
The first and most important anti-theft decision is the mounting method itself.
If a camera is too easy to pull off, theft prevention becomes much harder. That is why a more secure base matters so much.
A better mounting setup should do two things at once:
- hold the camera firmly during normal driving
- make removal slower, harder, and more obvious
For many users, this is where a fixed base becomes important. A stable base does more than improve camera performance. It also makes the product feel less exposed. A camera that sits firmly and intentionally on the vehicle is harder to treat like a quick grab item.
If you are shopping for a new backup camera, it is worth thinking about mount security from the start, not just image quality or signal range.
2. Use a Locking Clip, Safety Lock Buckle, or Tamper-Resistant Hardware
If theft is one of your biggest concerns, this is the feature area to pay close attention to.
A camera becomes much harder to steal when it includes or supports extra retention features such as:
- a locking clip
- a safety lock buckle
- tamper-resistant screws
- an anti-loosen design
- a mount that cannot be removed in seconds by hand
This matters because most theft of visible vehicle accessories is opportunistic. A thief usually looks for something quick, easy, and low-risk. Even a small extra barrier can make the camera much less appealing.
That is why anti-theft design is not just about making removal impossible. It is about making removal inconvenient enough that the person gives up.
For RVs, trailers, and trucks, a more secure retention design can also help reduce movement and accidental loosening, which adds peace of mind even when theft is not the issue.
3. Avoid the Most Exposed Mounting Position When You Have Options
Some camera positions are easier to reach than others.
If your setup allows flexibility, think about whether the camera can be mounted in a place that is:
- less obvious from a distance
- harder to reach without stepping close to the vehicle
- less exposed to passing foot traffic
- more protected by trim, plate position, or rear structure
This does not mean hiding the camera so much that performance suffers. The camera still needs a useful field of view. But a slightly more protected position can reduce the feeling that it is sitting out in the open.
This is especially relevant for larger vehicles like RVs and trailers, where the rear area is often more visible in campgrounds, parking lots, and roadside stops. If you rely on a backup camera for RV travel, the goal is to balance visibility for driving with a mounting position that does not invite unnecessary attention.
4. Check the Camera Regularly for Looseness or Tampering
Not every security problem starts as theft. Sometimes it starts as a mount that has been nudged, loosened, or partially disturbed.
That is why a quick visual check helps.
Get into the habit of checking your camera:
- before a long drive
- after fuel stops
- after overnight parking
- after heavy rain or rough roads
- before backing into a campsite or loading area
Look for:
- a shifted angle
- signs of looseness
- scratches or handling marks around the mount
- changes in image alignment
- wiring that looks pulled or stressed
This only takes a few seconds, but it can help you catch a security issue before it becomes a missing camera.
5. Park Like Someone Might Notice the Camera
Parking habits matter more than many owners realize.
If your camera is visible from the rear, think about how the vehicle sits when parked in public.
Smarter habits include:
- parking in better-lit areas
- avoiding isolated overnight street parking when possible
- backing close to a wall or barrier if practical
- choosing camp or fuel stops where the rear of the vehicle is less exposed
- checking the camera before you leave the vehicle for a longer stop
This does not mean you need to travel anxiously. It just means using the same common-sense approach you would use for any visible accessory on a vehicle.
For drivers using a backup camera for truck or trailer setup in mixed public and work environments, parking strategy can be just as important as the hardware itself.
Why Opportunistic Theft Matters More Than “Professional” Theft
Most owners are not worried about a highly organized theft operation. They are worried about casual theft: someone noticing a visible camera and thinking it can be removed quickly.
That distinction is useful, because it changes how you protect the camera.
To reduce opportunistic theft, the goal is to make the camera look:
- securely attached
- slower to remove
- not worth the effort
- likely to draw attention if tampered with
This is why fixed bases, secure brackets, and lock-style retention features matter so much. They do not need to make the system invincible. They need to make it inconvenient.

How to Talk About Theft Prevention Without Overpromising
It is important to keep expectations realistic.
No visible vehicle accessory can be guaranteed theft-proof in every setting. But there is a big difference between something that is easy to pull off and something that is clearly secured with a stable base and locking retention.
The best anti-theft setup usually combines:
- a secure mounting base
- extra retention hardware
- sensible positioning
- regular checks
- smarter parking habits
That combination can make a real difference in everyday use.
What to Look for If You Are Buying a New Camera
If security is one of your priorities, look beyond image specs.
Ask questions like:
- How secure is the mount?
- Does it use a stronger base or fixed bracket?
- Is there a lock buckle or retention clip?
- Will it look easy to remove from outside?
- Is it designed for larger vehicles that stay parked outdoors more often?
These details matter just as much as screen size or viewing angle if you live or travel in places where theft is a common concern.
If you are comparing models across larger vehicles, it can also help to browse systems built for more demanding use cases, such as trailer backup camera setups, where mounting confidence matters as much as the camera view itself.
Common Mistakes That Make a Camera Easier to Steal
Choosing a Mount Only for Convenience
Quick installation is useful, but if the camera feels too easy to remove, security should be part of the decision too.
Ignoring Extra Retention Hardware
A locking clip or safety buckle may seem like a small detail until you park overnight in a public place.
Never Checking the Camera After Installation
A mount can loosen over time, and early tampering signs are easier to spot if you look regularly.
Parking Without Thinking About Rear Exposure
If the camera is the most visible item on the back of the vehicle, it deserves at least some thought when choosing where and how to park.
Final Thoughts
If you have ever worried that your aftermarket backup camera could be stolen, you are not overthinking it. It is a valid concern, especially for drivers who park outdoors, travel often, or use RVs and trailers in public places.
The best response is not panic. It is better preparation.
A camera becomes much easier to trust when it is supported by:
- a secure mounting base
- a lock-style retention feature or tamper-resistant hardware
- a thoughtful mounting position
- regular checks
- smarter everyday parking habits
That combination helps reduce the chance of casual theft and shows owners that security has been considered as part of the real-world driving experience.
If you are comparing systems with daily practicality in mind, it is worth paying attention not just to image quality, but to how the camera is mounted and secured. A well-designed wireless backup camera should feel reliable both when you are driving and when the vehicle is parked.
FAQs
Can an aftermarket backup camera be stolen easily?
It depends on the mount and how exposed the camera is. A unit with a more secure base and better retention hardware is much harder to remove quickly than one that feels loosely attached.
What helps prevent backup camera theft?
A secure mounting base, locking clip or safety buckle, tamper-resistant hardware, smarter parking, and regular checks all help reduce theft risk.
Is a visible rear camera more likely to be targeted?
A camera that is easy to see and easy to reach may attract more attention, which is why mount security and placement matter so much.
Should I worry more about theft on an RV or trailer?
Many owners do worry more on RVs and trailers because the camera is often mounted higher, more visibly, and in places where the vehicle may sit parked longer.
Can a stronger mount really make a difference?
Yes. Most casual theft is opportunistic, so making the camera slower and harder to remove can make it much less appealing to steal.

By AaliyahGloria
Guides
May 18, 2026
Rainy weather makes driving harder in every direction, but the rear view is often where drivers feel the most frustrated. A backup camera that looks fine on a clear day can suddenly become blurry, foggy, streaked, or almost useless once rain starts falling.
This is a very common problem, and it usually has more than one cause. Water droplets stick to the lens. Road spray throws dirt and grime onto the camera housing. Moisture can create fogging, and low light makes everything look worse. The good news is that many of these problems can be improved with the right cleaning habits, better maintenance, and a camera system designed for real-world weather.
In this guide, you will learn why backup cameras get blurry in rain, how to clean the lens safely, how anti-rain lens protection helps, and what you can do to keep a clearer rear view in bad weather.
Quick Answer: Why Backup Cameras Get Blurry in Rain
| Problem | Common Cause | Quick Fix |
|---|---|---|
| Water droplets on the image | Rain sticking to the lens surface | Wipe the lens gently and keep it clean before driving |
| Cloudy or smeared view | Road grime, mud, or oily residue | Clean with a microfiber cloth and lens-safe cleaner |
| Foggy camera image | Condensation or moisture buildup | Dry the surface and check for weather sealing problems |
| Poor rear visibility at night in rain | Low light, glare, and dirty lens cover | Clean the lens and adjust screen brightness if needed |
| Rainy-day image always looks weak | Older camera design or poor weather resistance | Consider upgrading to a better weather-ready camera |
Why Rain Makes a Backup Camera So Hard to See
Most drivers assume the camera itself is failing when the image gets bad in rain. Sometimes that is true, but in many cases the issue is simply what is happening on the outside of the lens.
The most common reasons include:
- Water droplets on the lens: even a few drops can distort the picture and make objects behind the car look soft or warped.
- Road spray and dirt: rainwater mixes with dust, mud, and oils from the road, leaving a dirty film on the lens.
- Fogging or condensation: sudden temperature changes or trapped moisture can create a cloudy appearance.
- Low light and glare: bad weather usually comes with darker skies, reflections, and headlights that make a weak rear image feel even worse.
This is why rainy-weather visibility is not just about waterproofing. The camera also needs a clean lens surface, a clear image path, and good everyday maintenance.
How to Clean a Backup Camera Lens the Right Way
If your rear camera looks blurry in rain, cleaning the lens should be the first step.
Use this simple method:
- Make sure the vehicle is parked safely.
- Use a soft microfiber cloth, not a rough paper towel.
- If the lens is dusty or muddy, remove loose dirt gently first.
- Use water or a lens-safe cleaner if needed.
- Wipe the lens lightly without pressing too hard.
- Dry it with a clean part of the cloth.
This matters because the lens cover can be damaged by aggressive cleaning. A scratched or worn surface will hold water more easily and make the image look worse over time.
What Not to Use
- rough paper towels
- dirty shop rags
- harsh chemical cleaners
- abrasive pads
- anything that can scratch a coated lens cover
If your camera still looks hazy after a proper cleaning, the problem may be deeper than surface dirt. In that case, moisture intrusion, wear on the lens cover, or overall camera quality may be part of the issue.
How to Deal With Water Spots and Road Film
Rain alone is not always the biggest problem. On many vehicles, the rear camera gets hit by a mix of water, grit, and road residue. That combination creates a film that can stay on the lens even after the rain stops.
To reduce buildup:
- clean the lens before long drives in wet weather
- check it during fuel or rest stops
- wipe off dirt after driving on wet highways
- do not let grime sit on the lens for days
Regular cleaning is one of the easiest ways to keep a backup camera performing better in real road conditions.

Why Some Backup Cameras Stay Clearer in Rain
Not all camera systems handle wet weather equally well.
Some newer designs do a better job because they use features such as:
- better weather sealing
- smoother lens covers that shed water more easily
- hydrophobic or anti-rain surface treatment
- improved low-light performance
- stronger image processing in poor visibility
This is where anti-rain lens protection becomes especially useful.
What Is an Anti-Rain Lens Coating?
An anti-rain or water-repellent coating is designed to help water bead up and slide off the lens surface more easily instead of sitting there and distorting the view.
In real use, that can help by:
- reducing how long water stays on the lens
- making droplets smaller and less disruptive
- improving visibility between wipes or stops
- helping the lens stay clearer during light or moderate rain
It is not magic, and it does not eliminate the need for cleaning. In heavy spray, mud, or long highway drives, the lens can still get dirty. But a better lens surface can make a noticeable difference compared with a camera that collects and holds water easily.
Rainy-Weather Tips for a Clearer Rear View
Along with cleaning the lens, these habits can help keep your rear view more usable in bad weather:
- Wipe the camera before you leave: starting with a clean lens always helps.
- Check the image early in the drive: do not wait until you need to reverse in a tight space.
- Clean it during stops: a quick wipe at a gas station can make a big difference.
- Keep the rear area of the vehicle cleaner: if the tailgate or rear panel is covered in grime, the camera usually will be too.
- Use mirrors together with the camera: in bad weather, the safest approach is to use every available view.
- Adjust the monitor if needed: brightness and glare can make a wet-weather image harder to read.
If you rely on a wireless backup camera, it is also worth checking that the image remains stable in poor weather and low light, not just in sunny daytime driving.
When the Problem Is More Than Dirt
Sometimes cleaning helps only a little. That usually means the issue may be one of these:
- a scratched or worn lens cover
- moisture trapped inside the camera housing
- weak low-light performance
- aging image quality
- poor weather resistance in the original design
If your camera repeatedly turns cloudy, blurry, or difficult to use whenever the weather changes, it may be time to upgrade rather than keep fighting the same problem.
That is especially true if you drive often in rain, use your vehicle for camping or towing, or depend heavily on rear visibility when parking. A better rear view mirror camera or upgraded rear camera system can make wet-weather driving feel much more manageable.
What to Look for in a Weather-Ready Backup Camera
If you are shopping for a replacement or upgrade, focus on more than just screen size.
Look for a system with:
- good image clarity in low light
- strong weather resistance
- a lens design that handles water better
- easy maintenance and accessible cleaning
- stable performance in everyday rain and road spray
These details matter more than many drivers expect because bad weather is exactly when a backup camera becomes most important.
Common Mistakes That Make the Image Worse
Cleaning the Lens With the Wrong Material
A rough towel can scratch the surface and make water distortion worse over time.
Ignoring the Lens Until the Image Is Already Bad
By the time the screen looks very blurry, the lens is often carrying more than just rainwater.
Assuming All Waterproof Cameras Perform the Same
Weather resistance helps, but lens design, coating, and image quality still matter.
Relying on the Camera Alone in Heavy Rain
Use the camera, mirrors, and careful driving habits together when visibility is poor.
Final Thoughts
If your backup camera gets blurry in rain, you are dealing with a very common problem, not a strange one-off issue. Most of the time, the biggest causes are water on the lens, road film, fogging, and weak rainy-weather visibility.
The best way to improve it is a combination of:
- safe lens cleaning
- regular maintenance
- smarter rainy-day use habits
- a better camera design if your current one struggles in wet weather
A clean lens and a weather-ready camera will not make storms disappear, but they can make your rear view much clearer when conditions are working against you.
FAQs
Why does my backup camera get blurry when it rains?
Rainwater, road spray, grime, fogging, and low light can all reduce image clarity. Often, the biggest cause is water or dirt sitting directly on the lens surface.
How do I clean a backup camera lens safely?
Use a clean microfiber cloth and gentle lens-safe cleaner or water. Avoid rough paper towels, harsh chemicals, and anything abrasive.
Can rain damage a backup camera?
A properly weather-resistant camera should handle normal rain, but repeated exposure, poor sealing, or moisture intrusion can still create long-term problems.
What does an anti-rain lens coating do?
It helps water bead and slide off the lens more easily, which can reduce how much rain distorts the camera view.
When should I replace my backup camera?
If the image stays foggy, blurry, scratched, or unreliable even after cleaning, it may be time to upgrade to a better weather-ready system.
FAQ
Not at all! Our products, including the Solar5, Solar4B, Solar3A Plus feature hassle-free designs like magnetic installation and wireless setups. These make it easy to install on RVs, trailers, and other large vehicles without professional assistance.
Are AUTO-VOX backup cameras compatible with all vehicle types?
Yes, Auto-Vox offers a wide range of products tailored to different vehicle types, including cars, trucks, RVs, trailers, and vans. For example, the Solar3C is specifically designed for large vehicles, while other models cater to standard cars and smaller vehicles.
How does AUTO-VOX ensure the product's durability in extreme weather?
AUTO-VOX products are built with high-quality, weather-resistant materials. They are designed to withstand extreme heat, cold, rain, and snow, ensuring reliable performance in all conditions.
What are the benefits of shopping with AUTO-VOX?
We offer free shipping across the US, 24/7 customer support, 100% secure payment, and a 30-day return policy to ensure a risk-free shopping experience.
How does AUTO-VOX support sustainable driving?
AUTO-VOX integrates sustainability into its product design. For example, the Solar3A Plus features advanced solar-assisted charging and power-saving technology, reducing battery consumption by 50% while maintaining excellent performance and reliability.
Why are EU/UK prices different from US prices?
EU and UK prices reflect local taxes, import duties, and shipping costs, which may cause differences from US pricing.
More questions? See our full FAQ